Guide 4 of 6
How to Lock Down Your Teen's iPhone the Right Way (Step by Step)
The playbook I wish I had when I started. It took me weeks to figure out. It'll take you an hour or two.
You'll need a Mac for one step. If you only have a Windows PC, this method won't work: turning on Supervision can only be done from a Mac (you can borrow one for that single step).
This takes an hour or two, and I won't pretend it's effortless. But you do it once, and then the nightly fight is just over: at bedtime the phone locks, cold, until morning. The one rule: don't skip the pre-flight checklist.
Context
Before you start (the 60-second version)
You're building two things:
- Supervision is the real control. It's a free, built-in iPhone mode (the same one schools and companies use) that flips on the ~200 controls Apple keeps switched off: blocking apps by name, blocking the factory reset, filtering the web silently. Unsupervised, a kid can peel your controls off in Settings in about ten seconds; supervised, they can't. You turn it on once, with a Mac.
- A small service (about $4/month, I use SimpleMDM) is the remote control. It's how you push rules and lock the phone from anywhere, in seconds.
That's a genuinely locked-down phone. Two optional upgrades come later, both linked at the end: the bedtime lock (the one most parents say changed their evenings) and a heavier NextDNS web filter.
Pick your path. Most families do the simple version above and stop there. Only a teen likely to factory-reset their way out needs the tamper-proof upgrade, Apple Business Manager (ABM). The catch is timing: ABM can only go on during the erase below, and Apple's approval takes one to two weeks, so decide now. If that's your kid, start ABM here first; otherwise skip it. (See the three paths compared if you're unsure.)
What you need: a Mac, a USB cable, and a willingness to erase the phone once (everything comes back from your iCloud backup right after).
Step 1 of 7
Pre-flight checklist (the landmines nobody warns you about)
about 15 min
Do these before you erase anything. Each one has personally cost me time.
Setting up the phone your kid already uses? The setup erases it, so the only thing that matters is a complete, current backup. Run a fresh iCloud backup right before you start and confirm it reads "just now." A few things don't ride along in an iCloud backup: authenticator / 2FA app codes, and Signal or WhatsApp history. If your kid uses any of those, migrate them separately first. (Each app has its own transfer steps in its settings, look up "transfer [app name] to new phone.")
- Confirm you have the kid's Apple ID password. Test it at
appleid.apple.comright now. - Make sure you won't get locked out of the kid's Apple Account. If the account only trusts this phone's number for its login codes, you can get locked out after the wipe. Easiest fix: add a second trusted phone number (yours) to the account at
appleid.apple.combefore you start. - Turn off Find My iPhone. Otherwise Activation Lock blocks setup and you're stuck.
- Confirm iCloud is fully synced (Photos, Messages, etc.) so nothing is lost in the erase.
- Check for a school profile. A phone can hold only one management profile at a time. If the school already manages it, yours won't install. You'll have to sort that with the school first.
Step 2 of 7
Supervise the phone (Apple Configurator)
about 20 min
This is the one step that requires the cable and the Mac. What follows is the no-ABM path, the sweet spot for most families: every real control, no Apple business account, no paperwork. Going the ABM route for a determined teen? You'll have set the ABM account up already (see the ABM section at the end), and you simply check Add to Apple Business Manager in the next step instead of leaving it off. Everything else is identical.
-
Connect the phone to your Mac with a USB cable and open Apple Configurator.
-
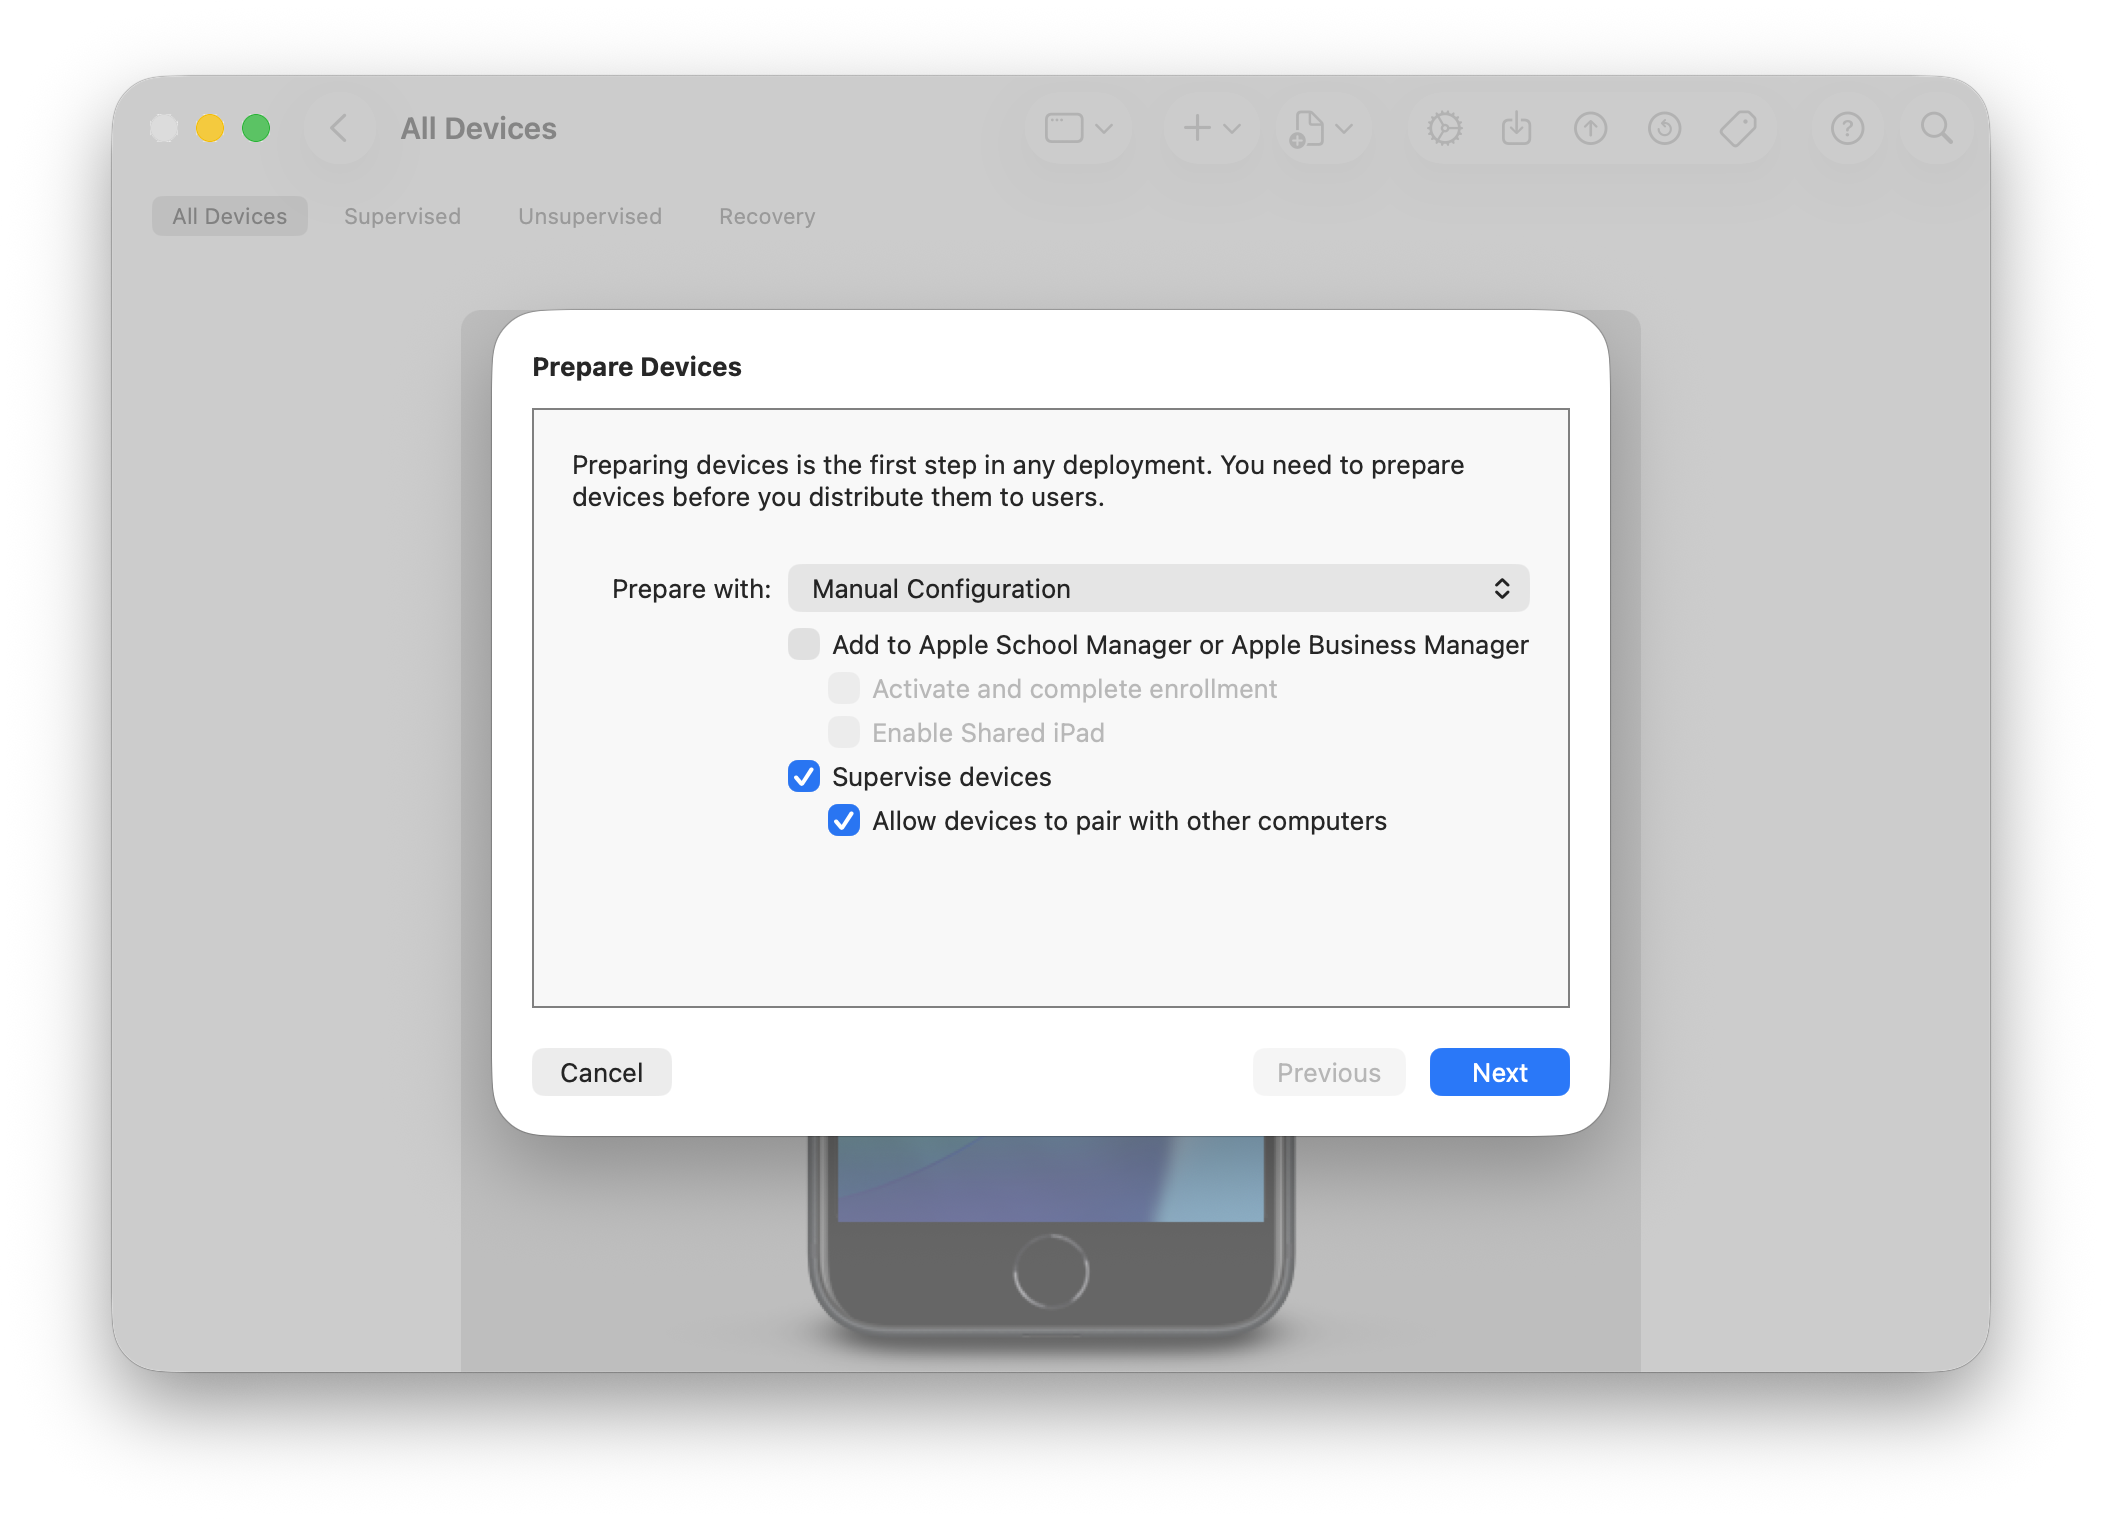
Select the device, then Actions → Prepare, and choose Manual Configuration.
-
Leave "Add to Apple Business Manager" unchecked for the common no-ABM path. (ABM users: check it instead, as noted just above.) Keep "Supervise devices" checked. This local path needs no Apple account at all. While you're here, decide on "Allow devices to pair with other computers", unchecking it is the more locked-down choice for a kid's phone, and you can't change it later without re-prepping. I left it checked.
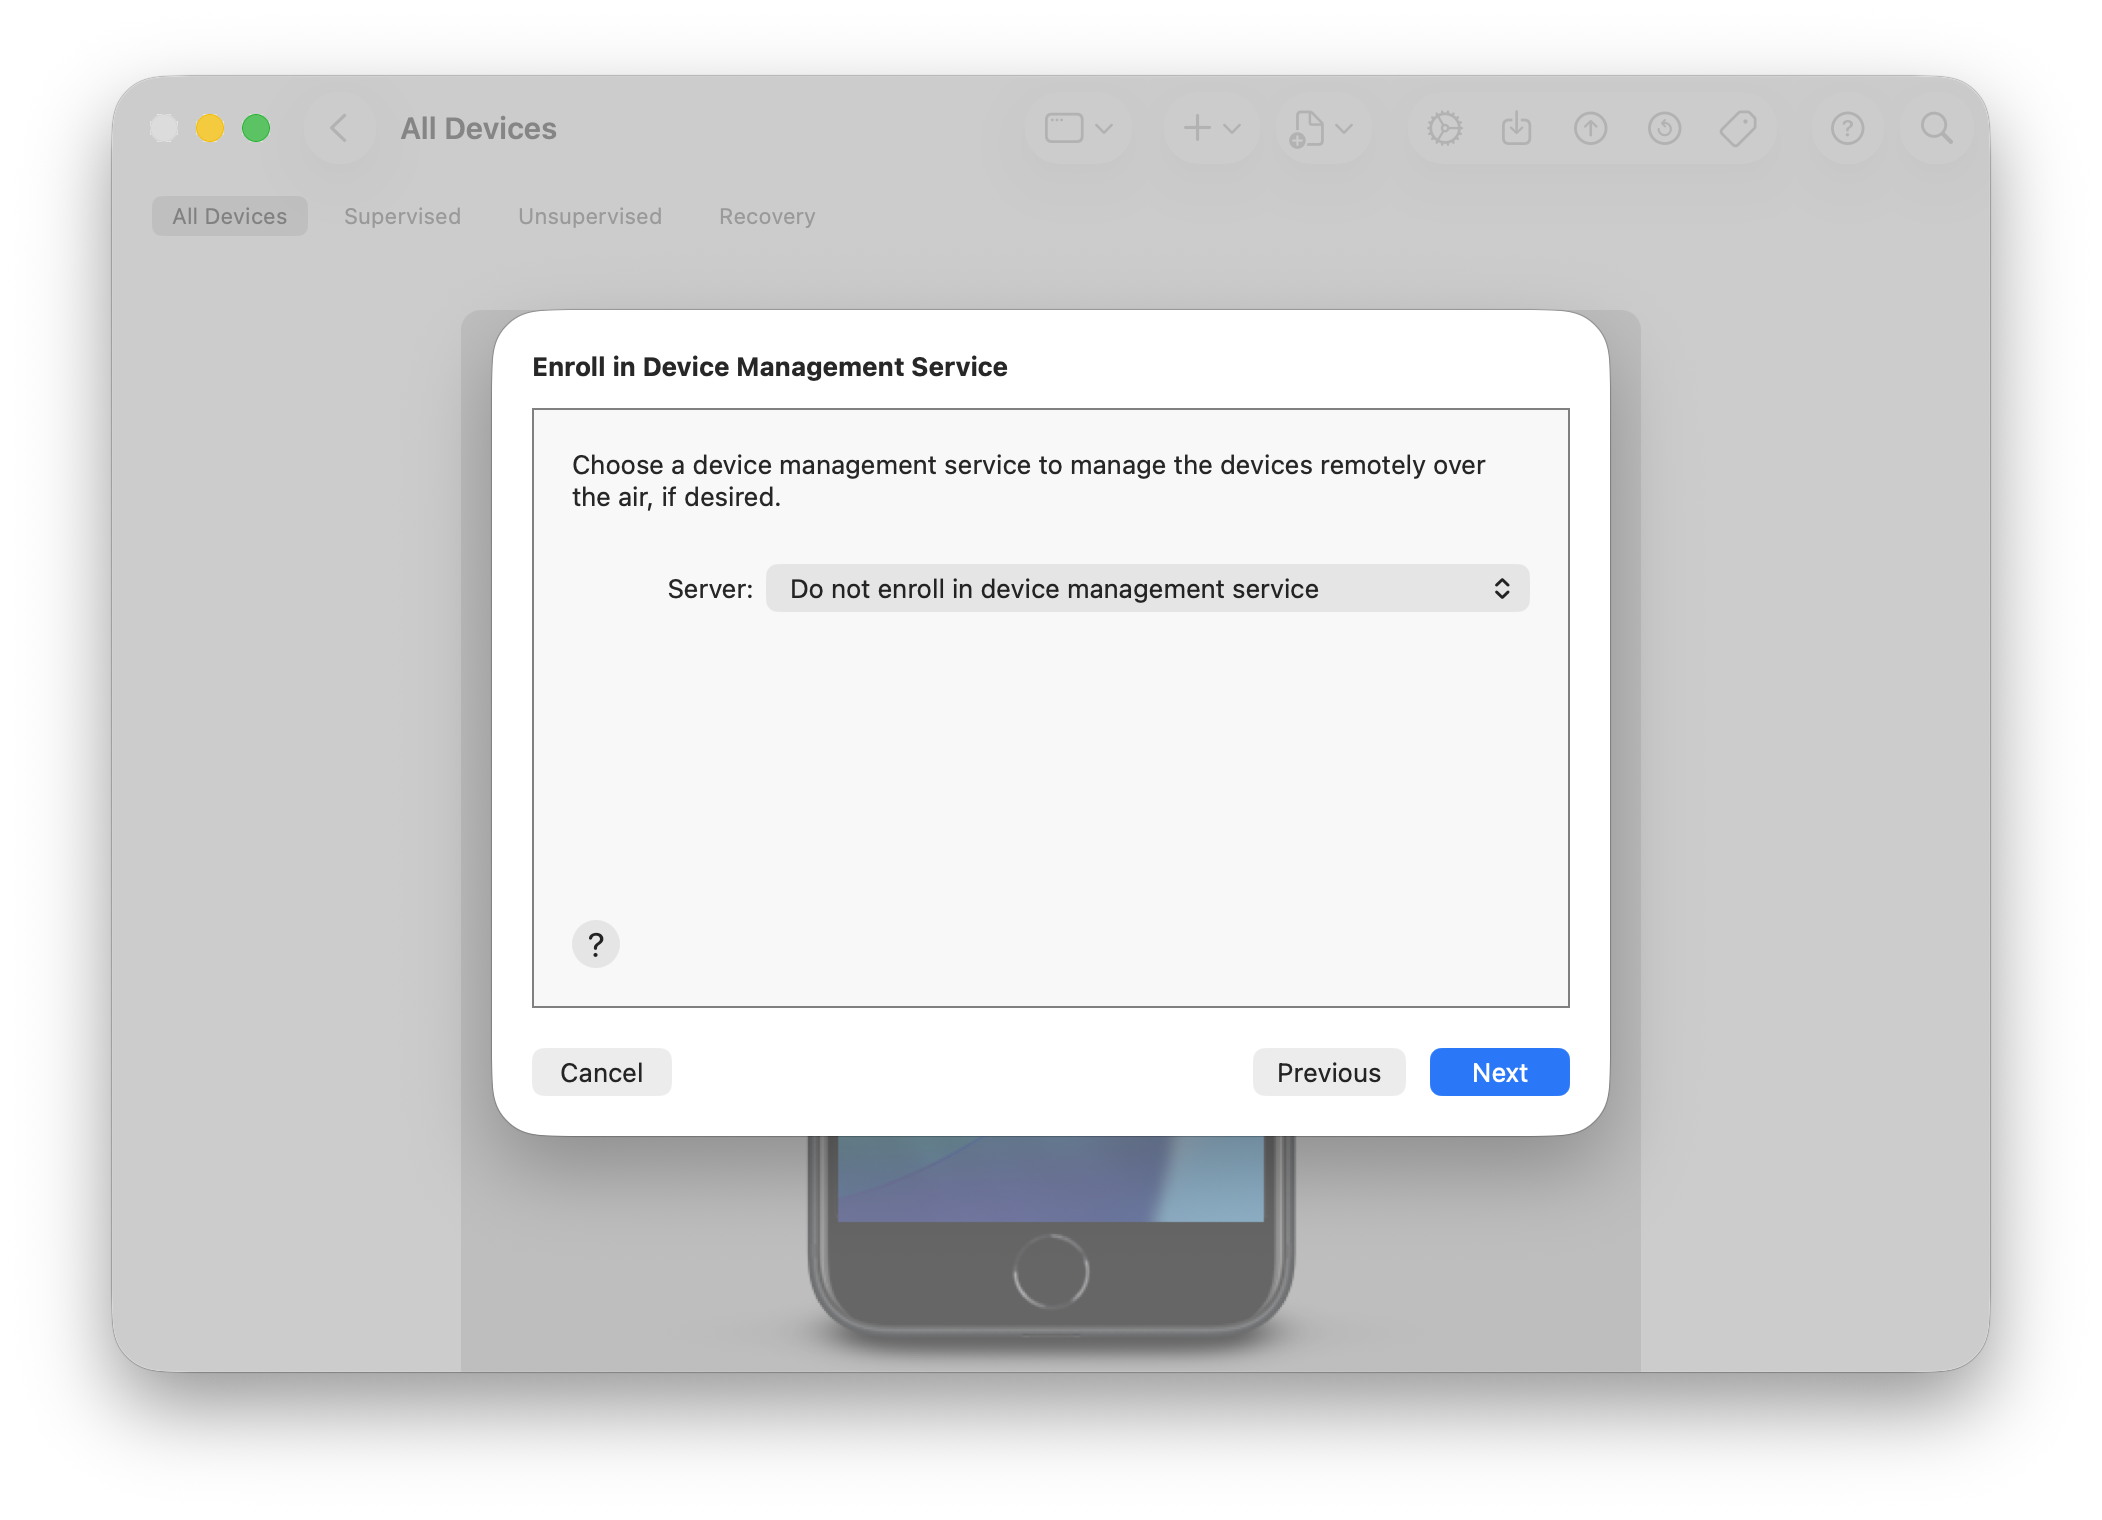
- Prepare shows an "Enroll in Device Management" screen early on. Choose "Do not enroll in MDM." This is deliberate: you sign up for the MDM and enroll the phone in the steps right after this one, by opening an enrollment link in Safari on the phone. There's nothing to pick here yet, so skip past it.
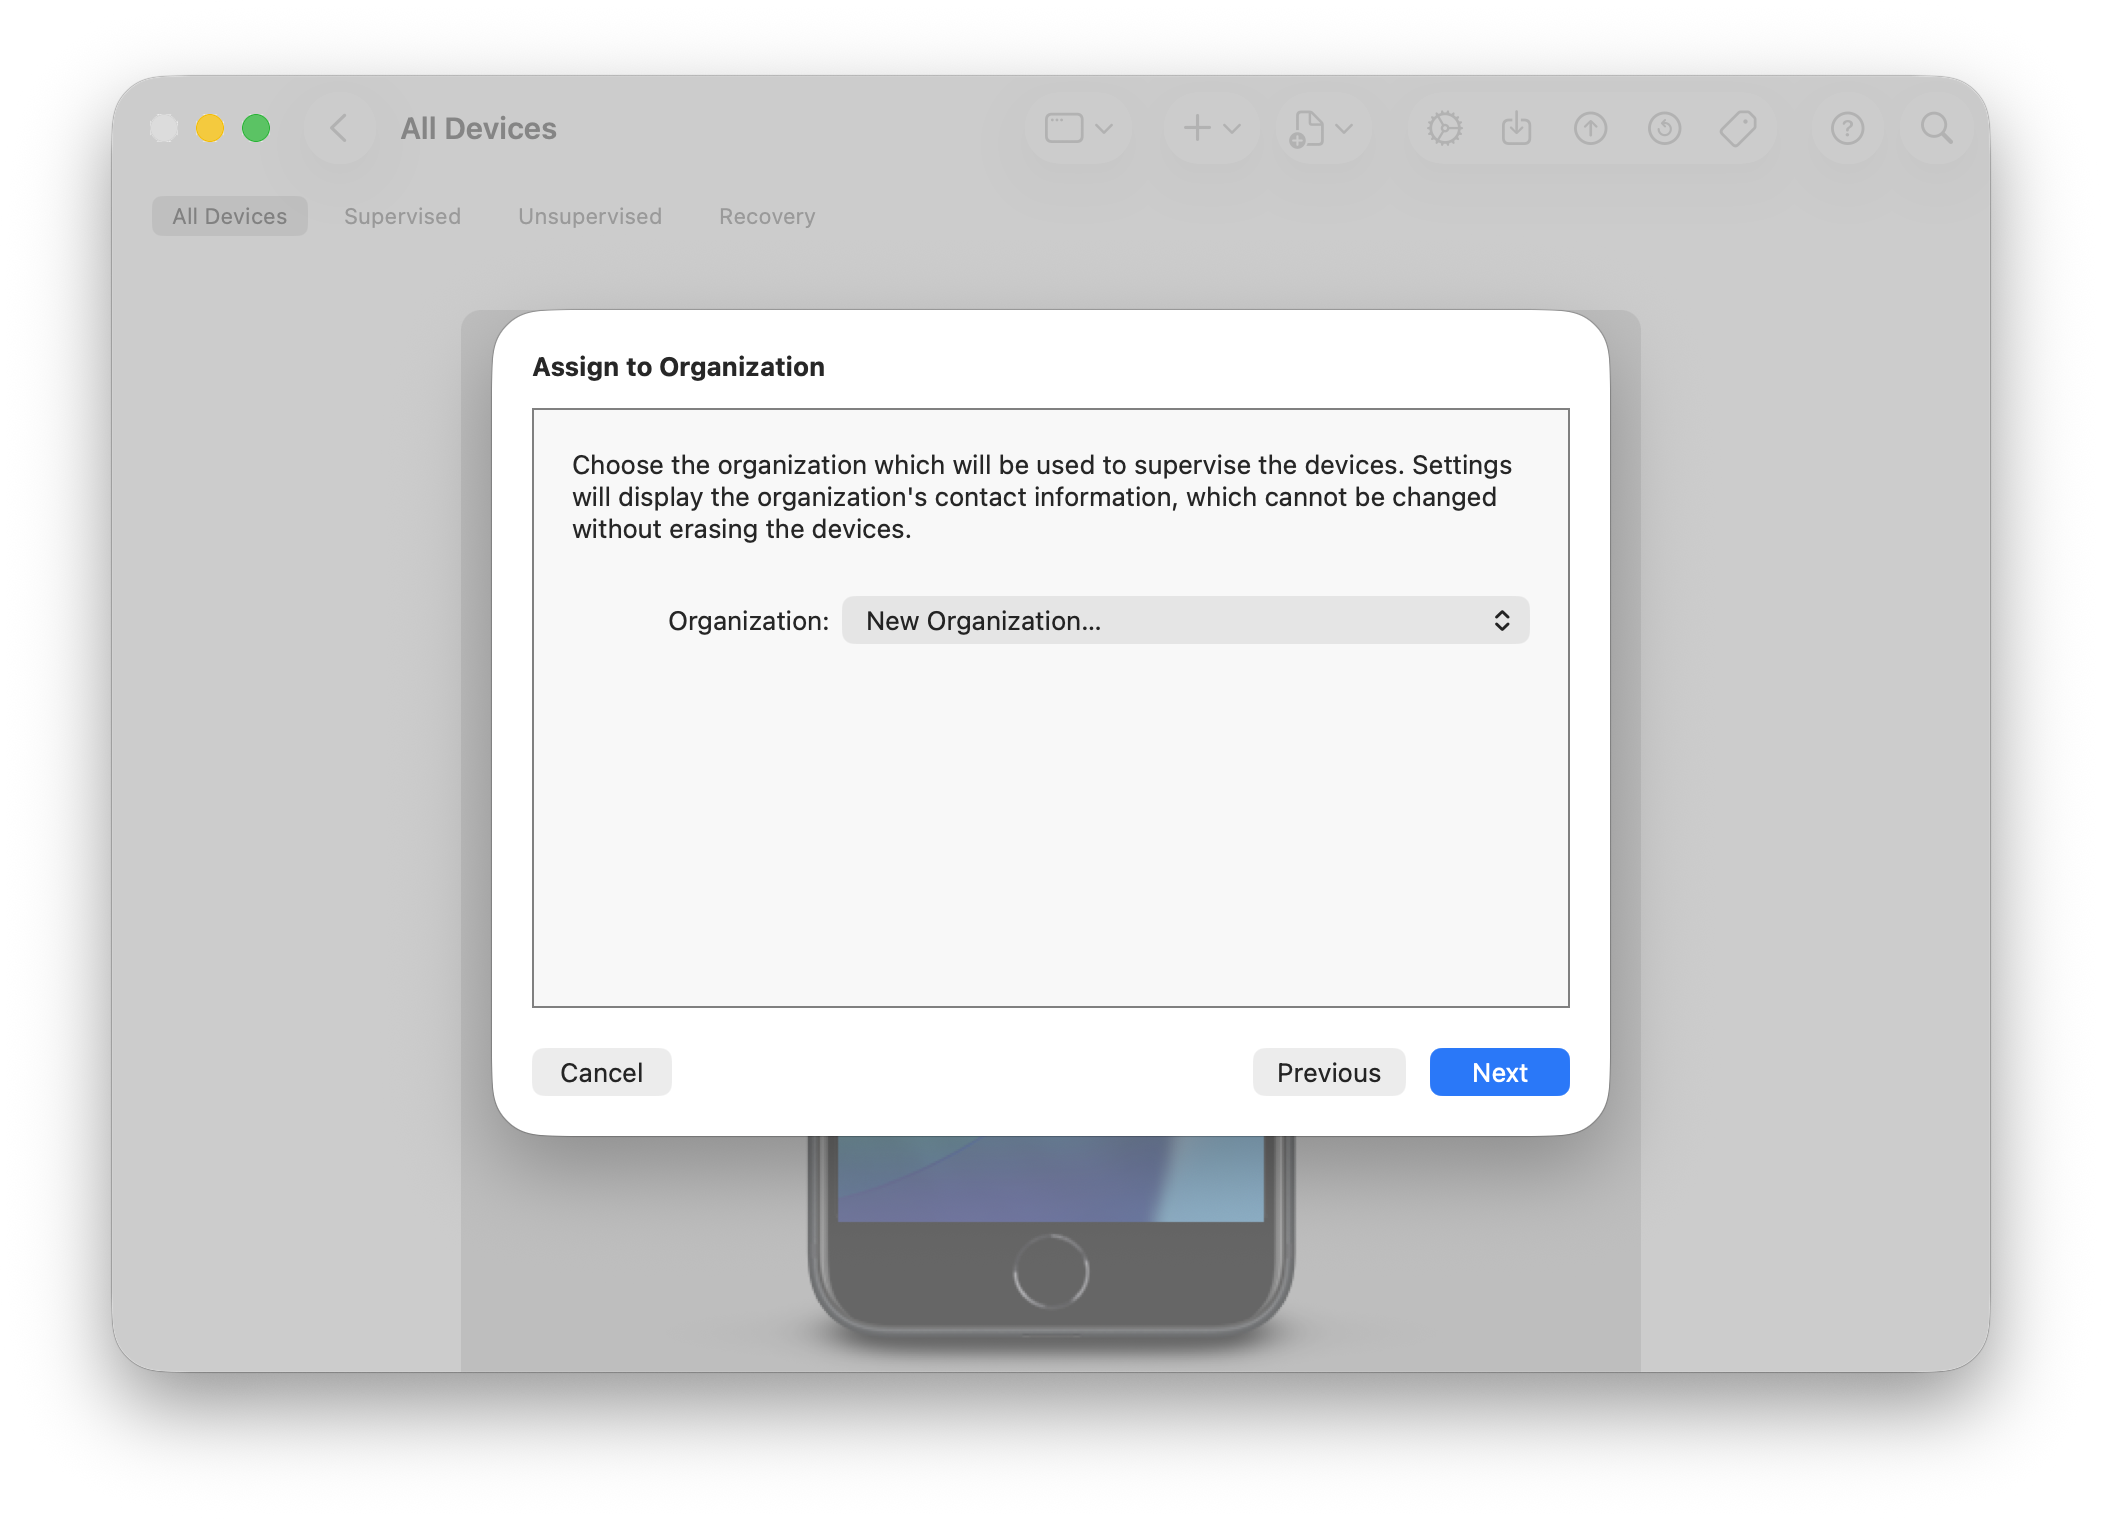
- At the Assign to Organization screen, click New Organization (Important note: if you're not using ABM for this walk-through, skip the next screen asking you to sign in to Apple Business/School Manager. If you are using ABM, then you'll sign in on the next screen).
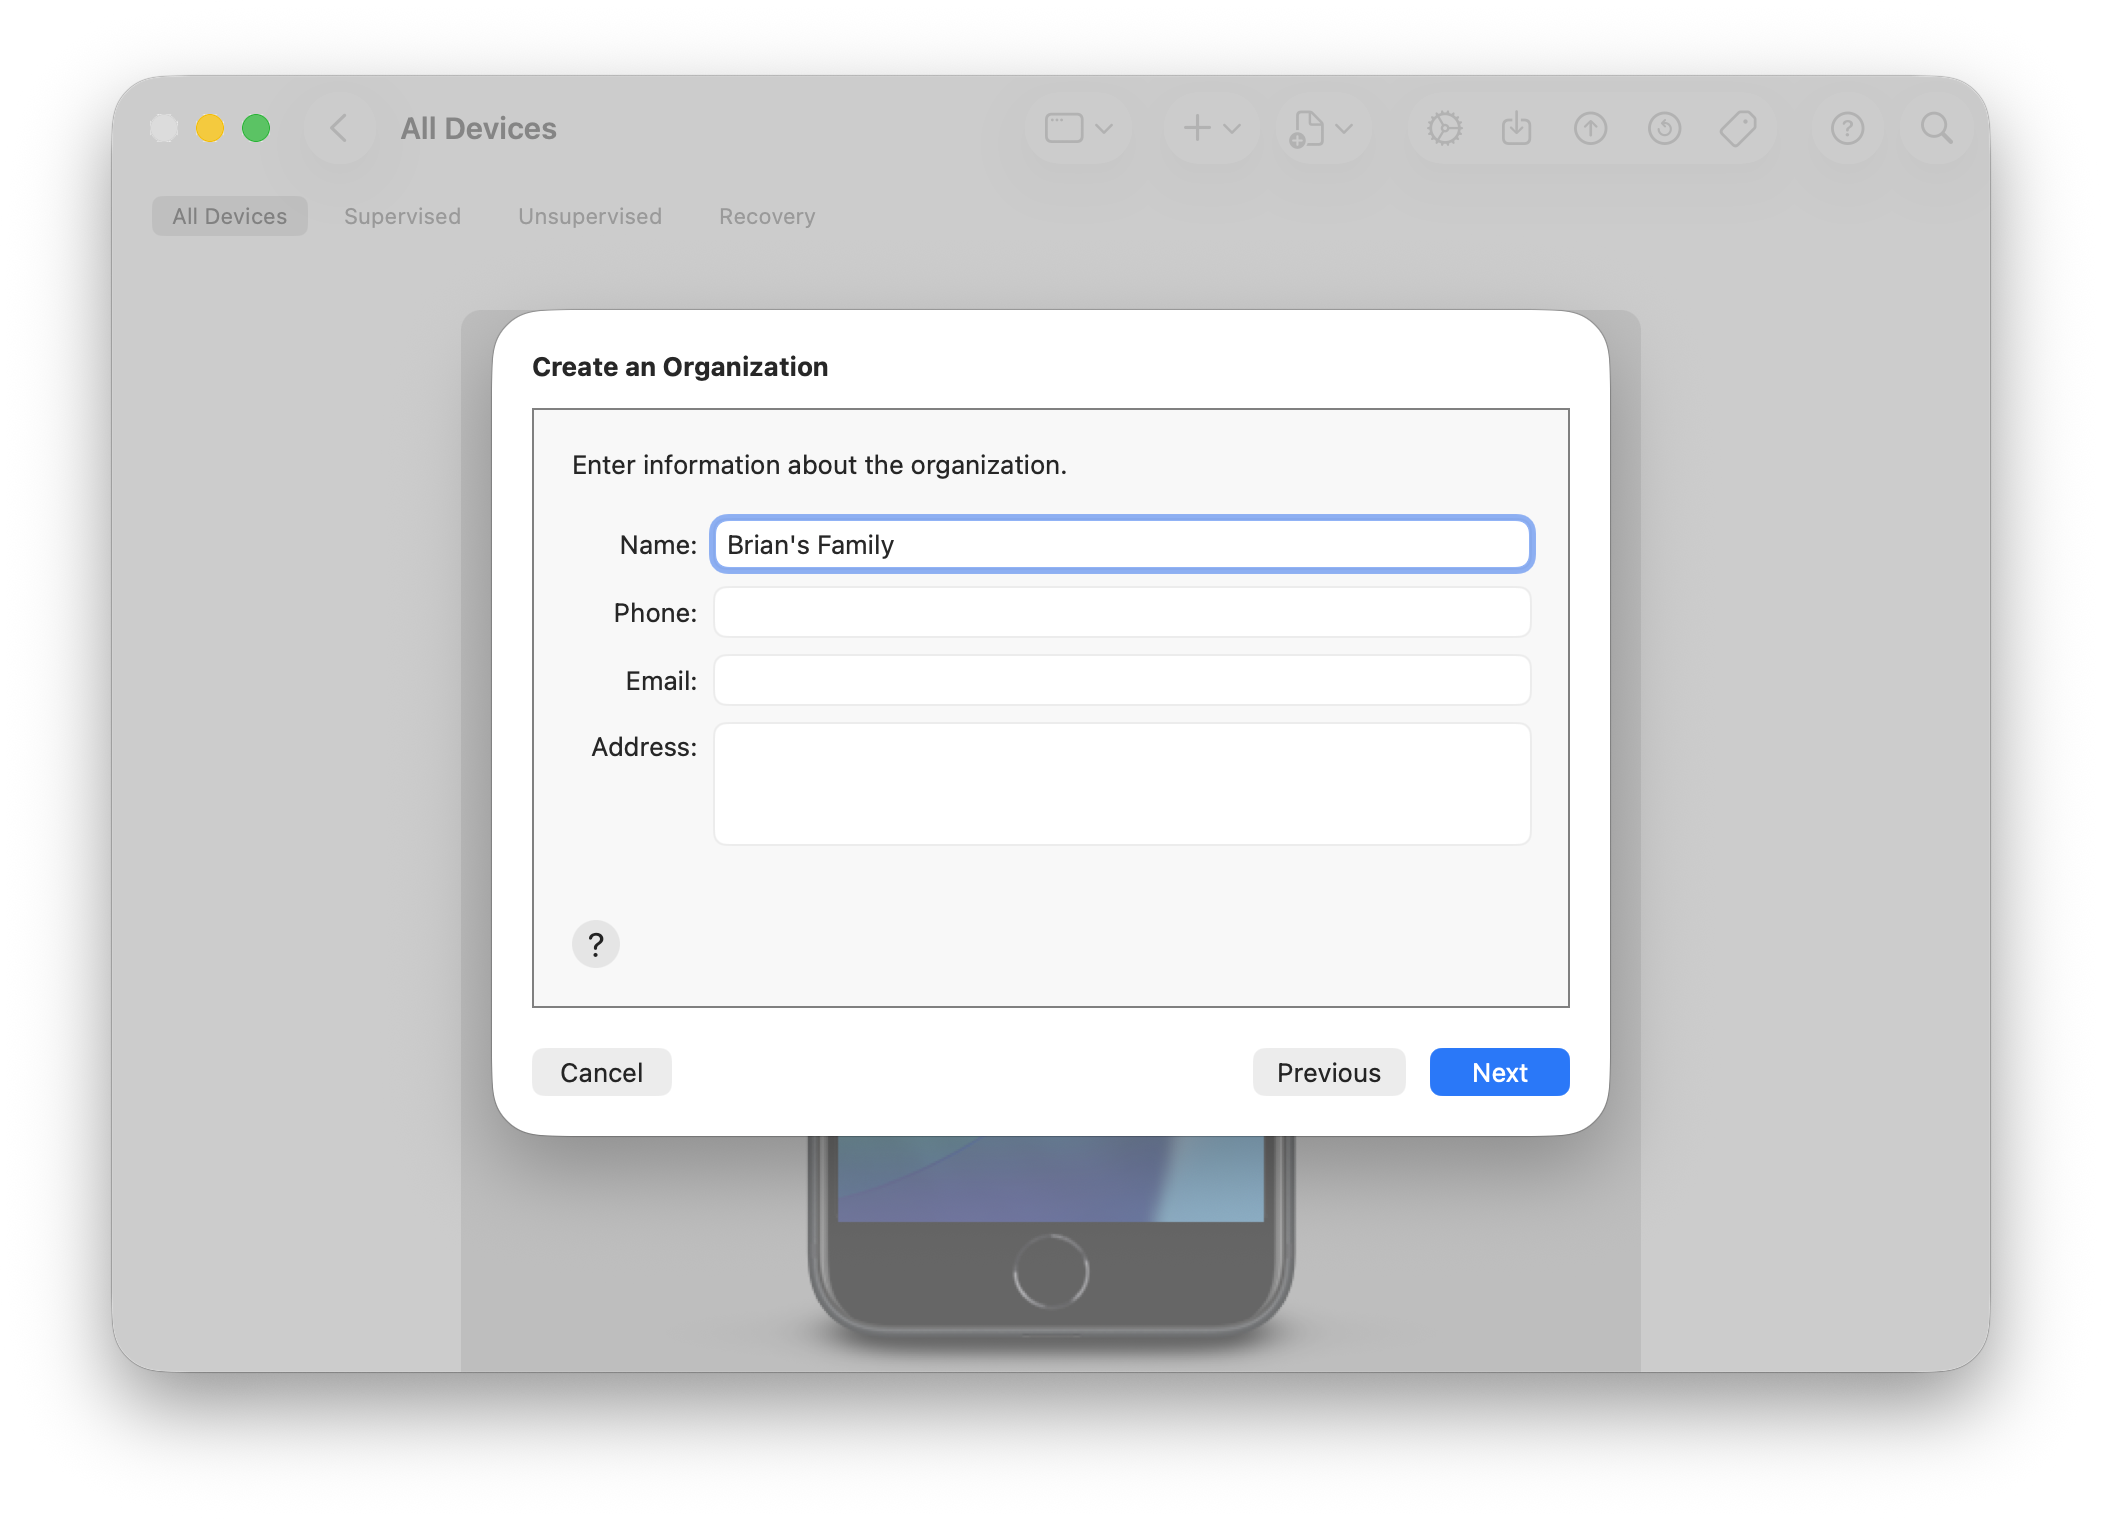
- On the Create Organization screen, the only field that matters is the organization name: it's just a label that becomes the "Supervised by your name" line at the top of the phone's Settings, so your family name is perfect. Any phone, email, or address fields can be left blank or filled with anything, since there's no Apple verification for a local org.
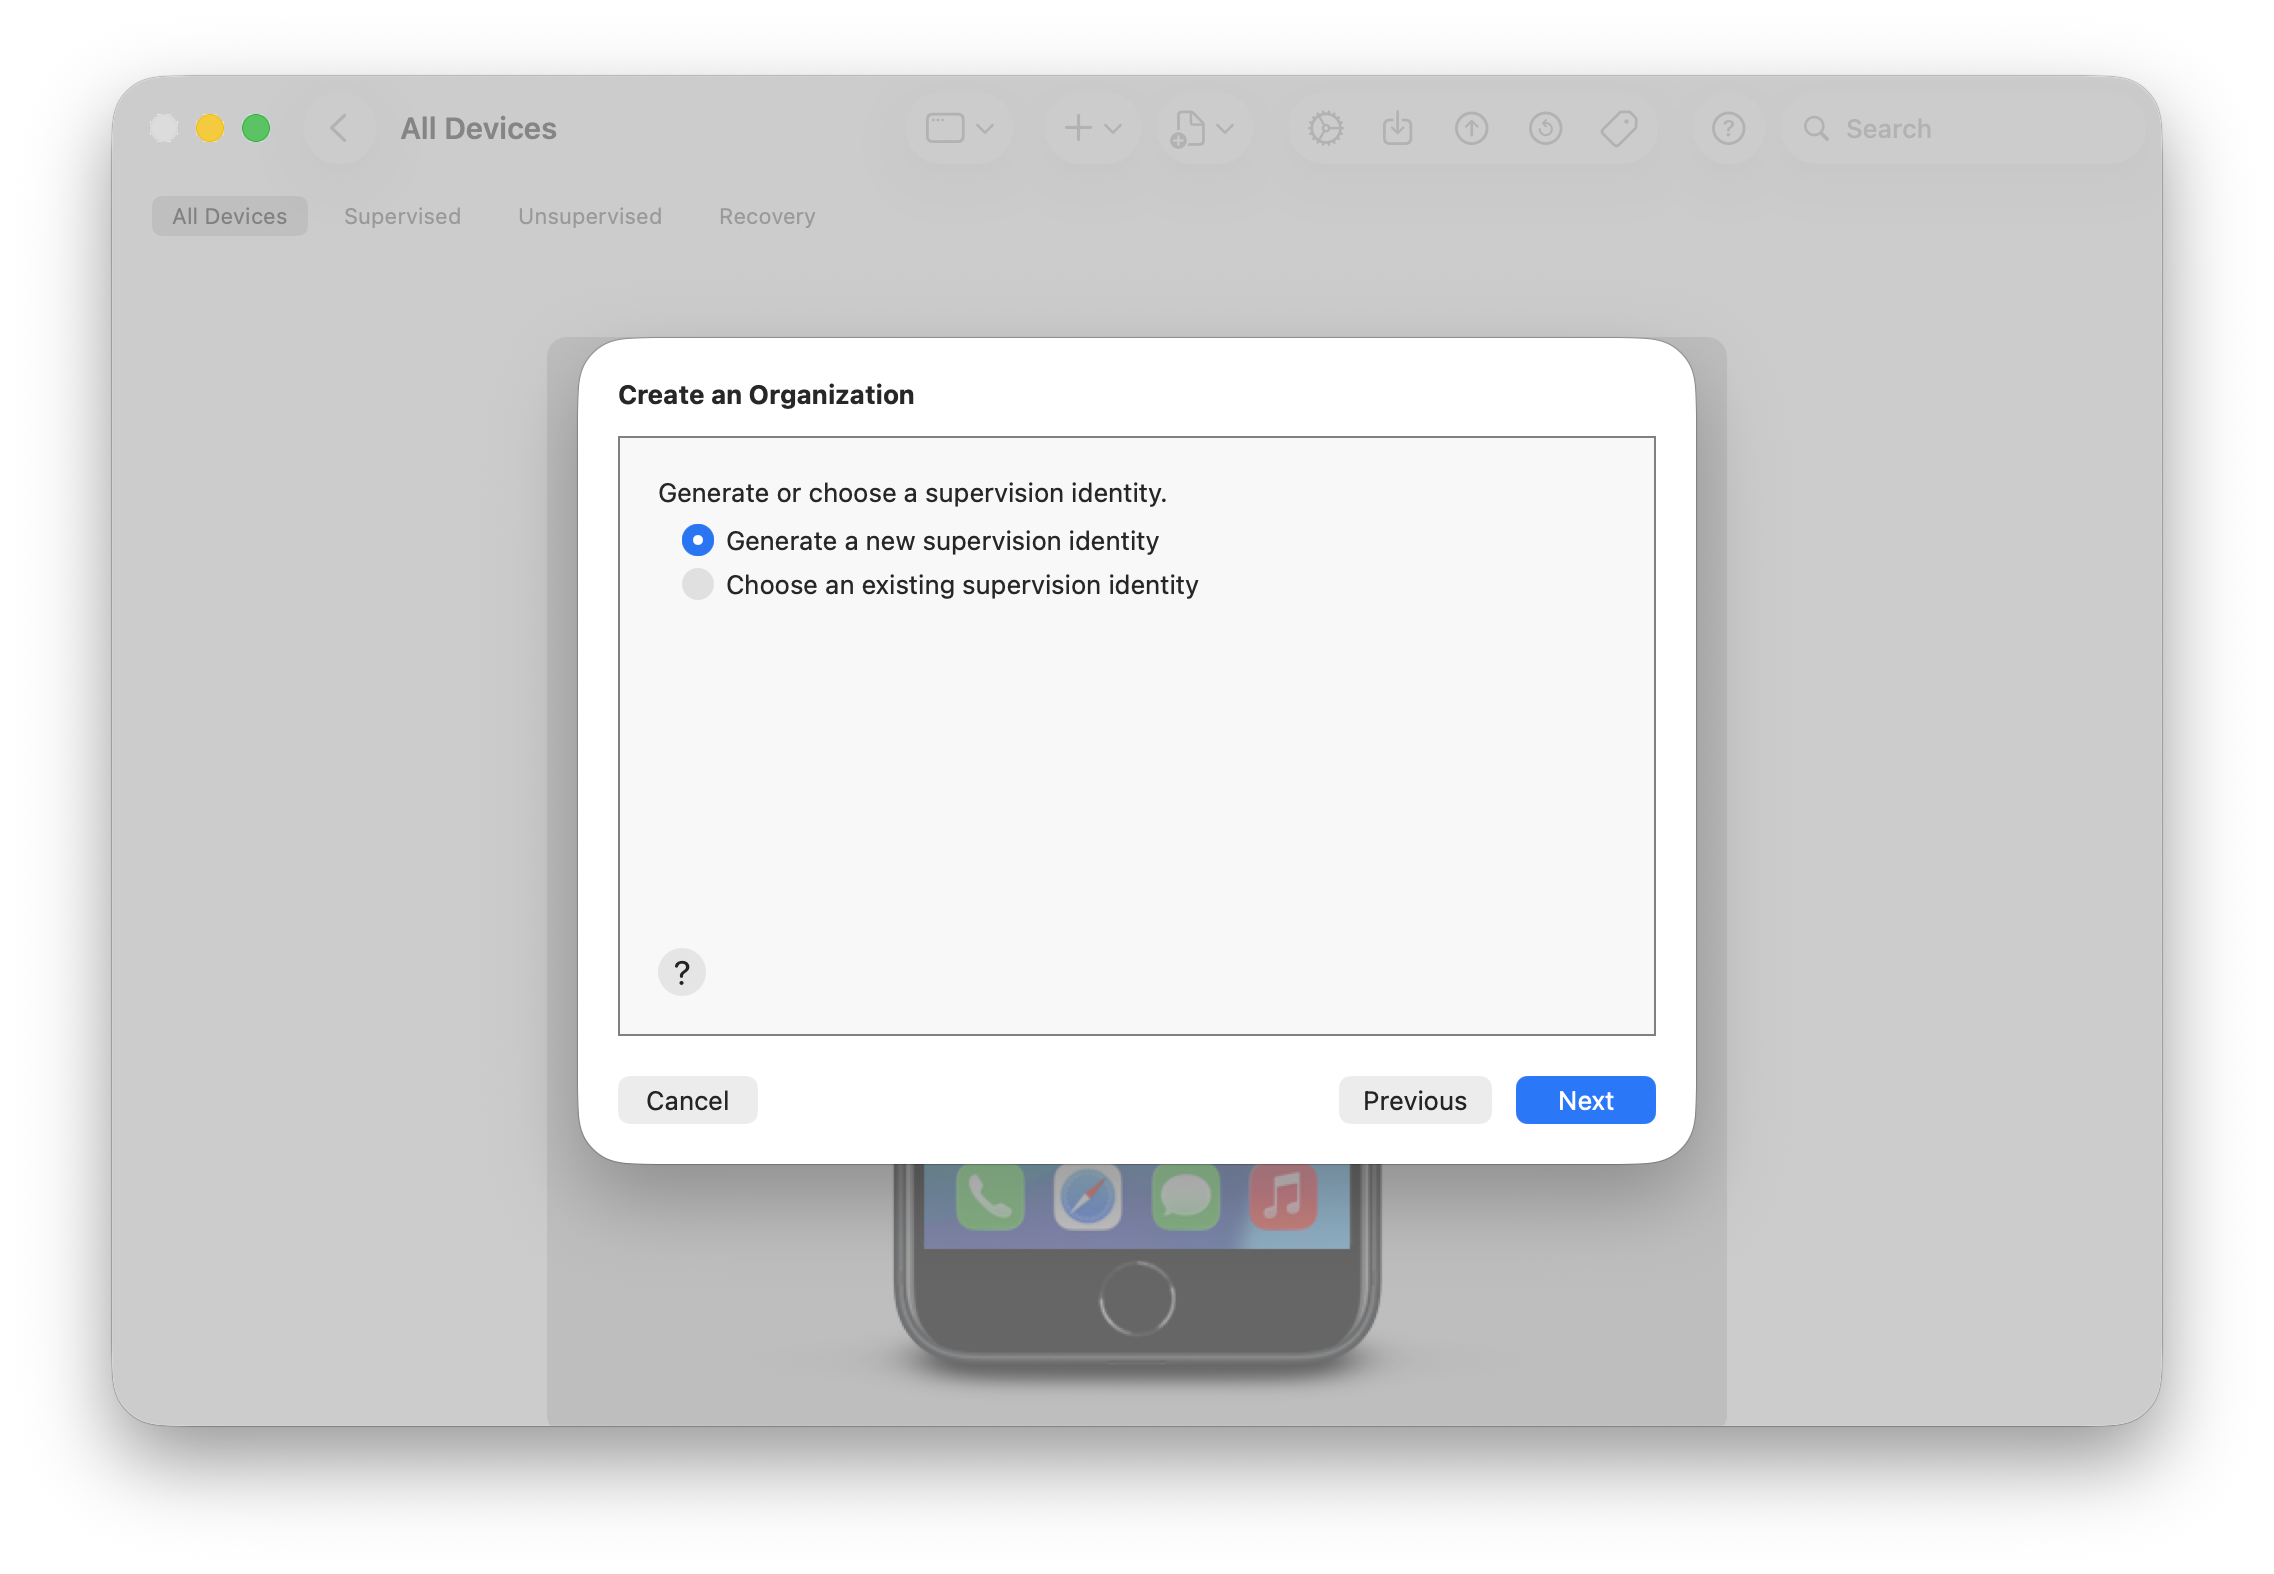
- When prompted, choose Generate a new supervision identity. Configurator makes a self-signed one and stores it on your Mac, so reuse the same organization and identity for every phone you set up (changing it later forces another erase).
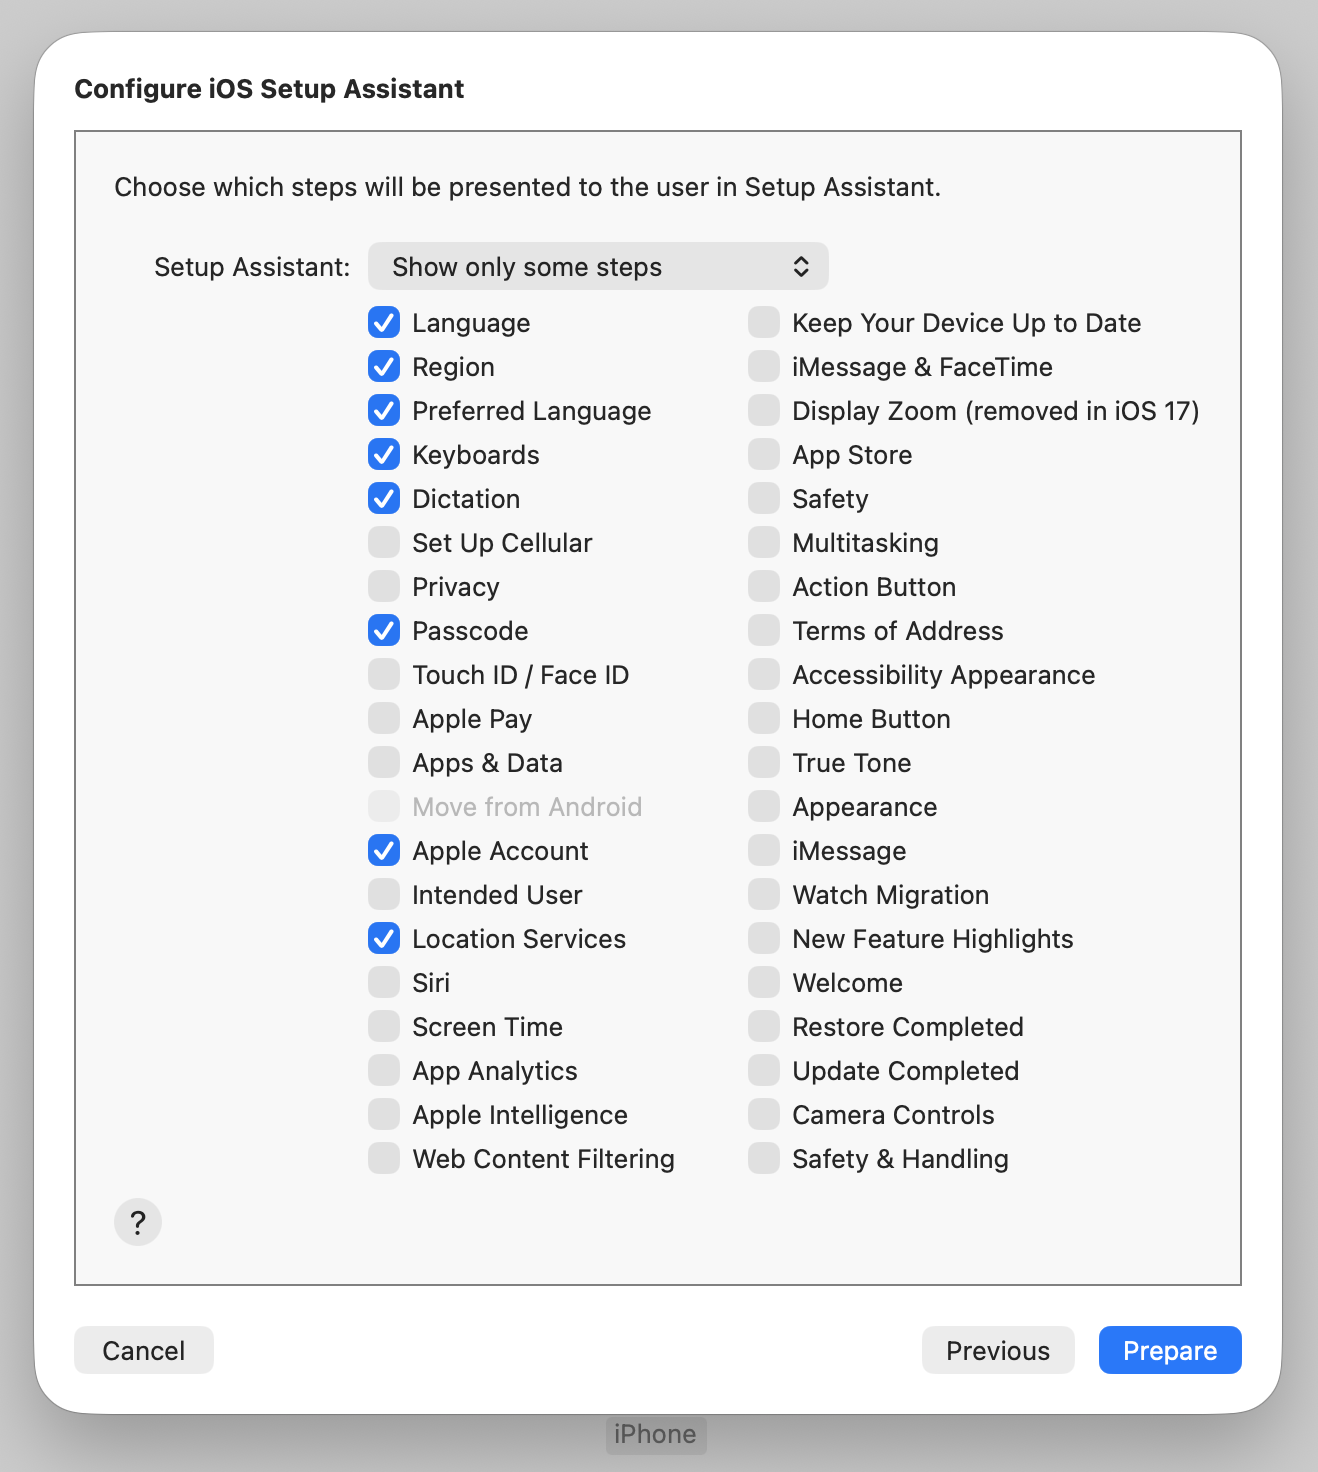
- On the Configure iOS Setup Assistant screen with a ton of options to check or uncheck, I just left the defaults. This is what controls the setup screens that will come up when you set up the phone after preparing it for supervision. Nothing here is critical.
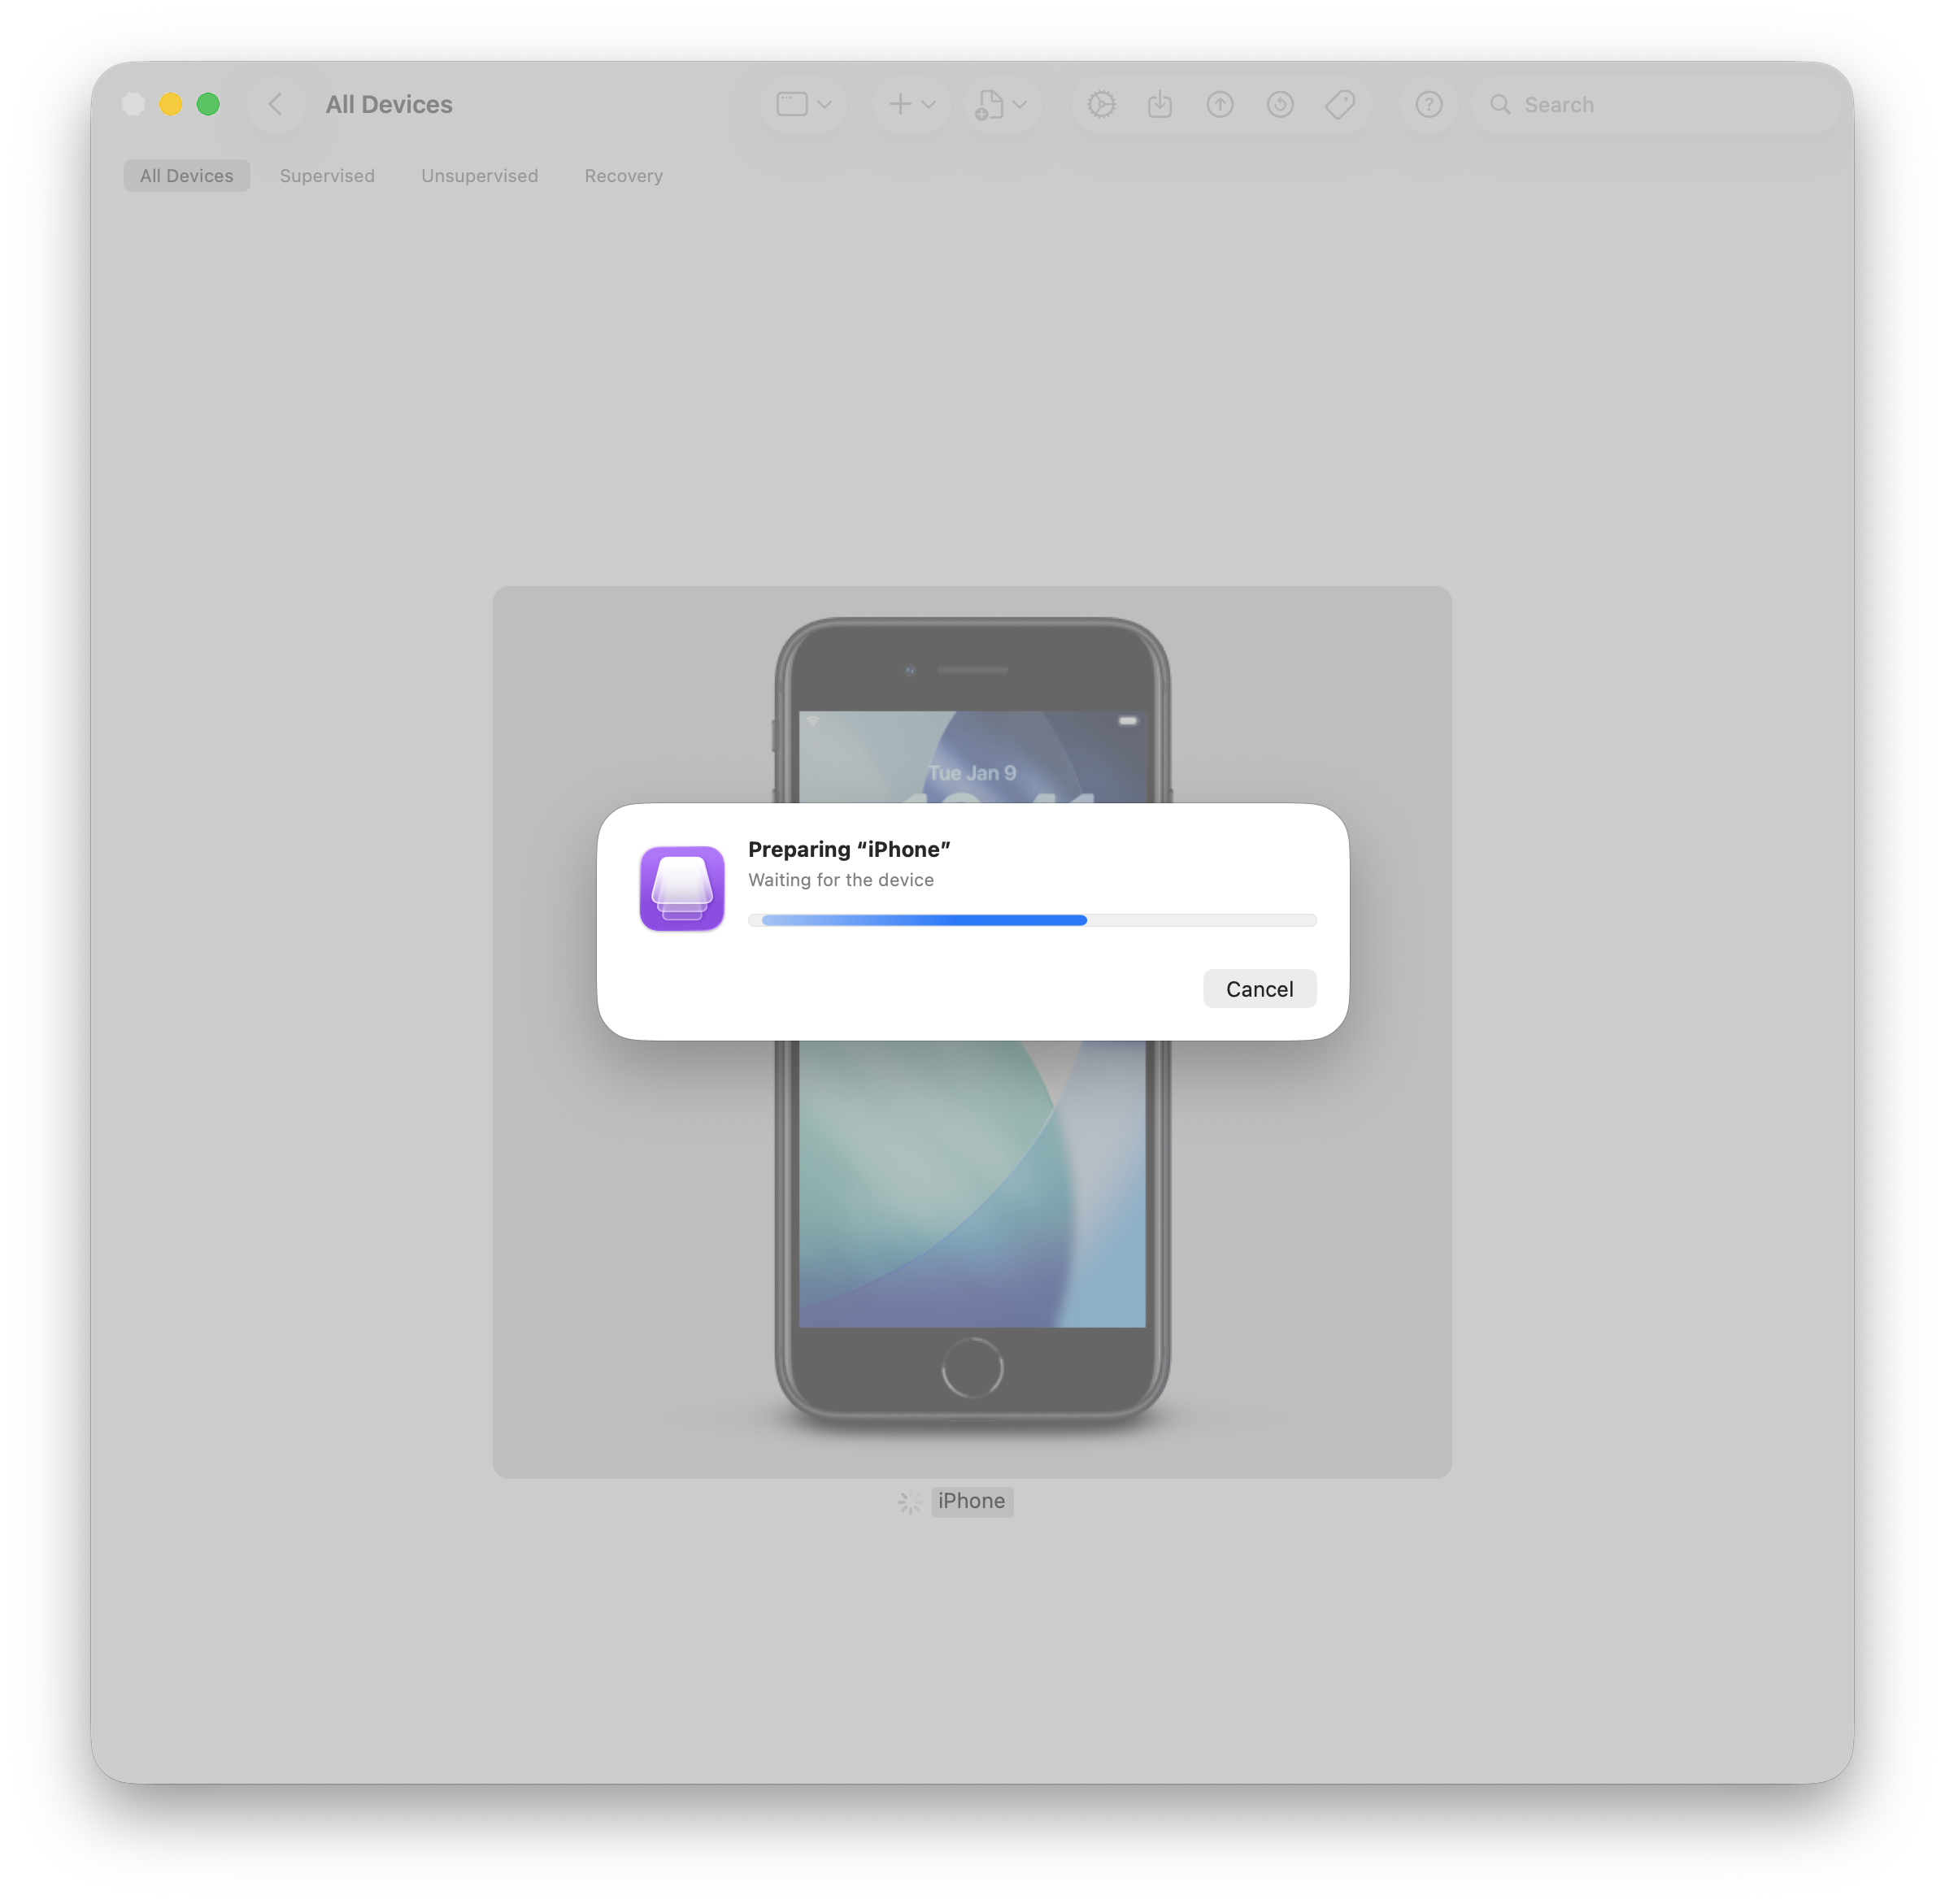
- Click Prepare and let it run. This erases the phone and reinstalls iOS (about 10 to 20 minutes). Keep the Mac awake and plugged in, and don't unplug until Configurator says it's done and the phone is back at the Hello screen. It comes back supervised.
-
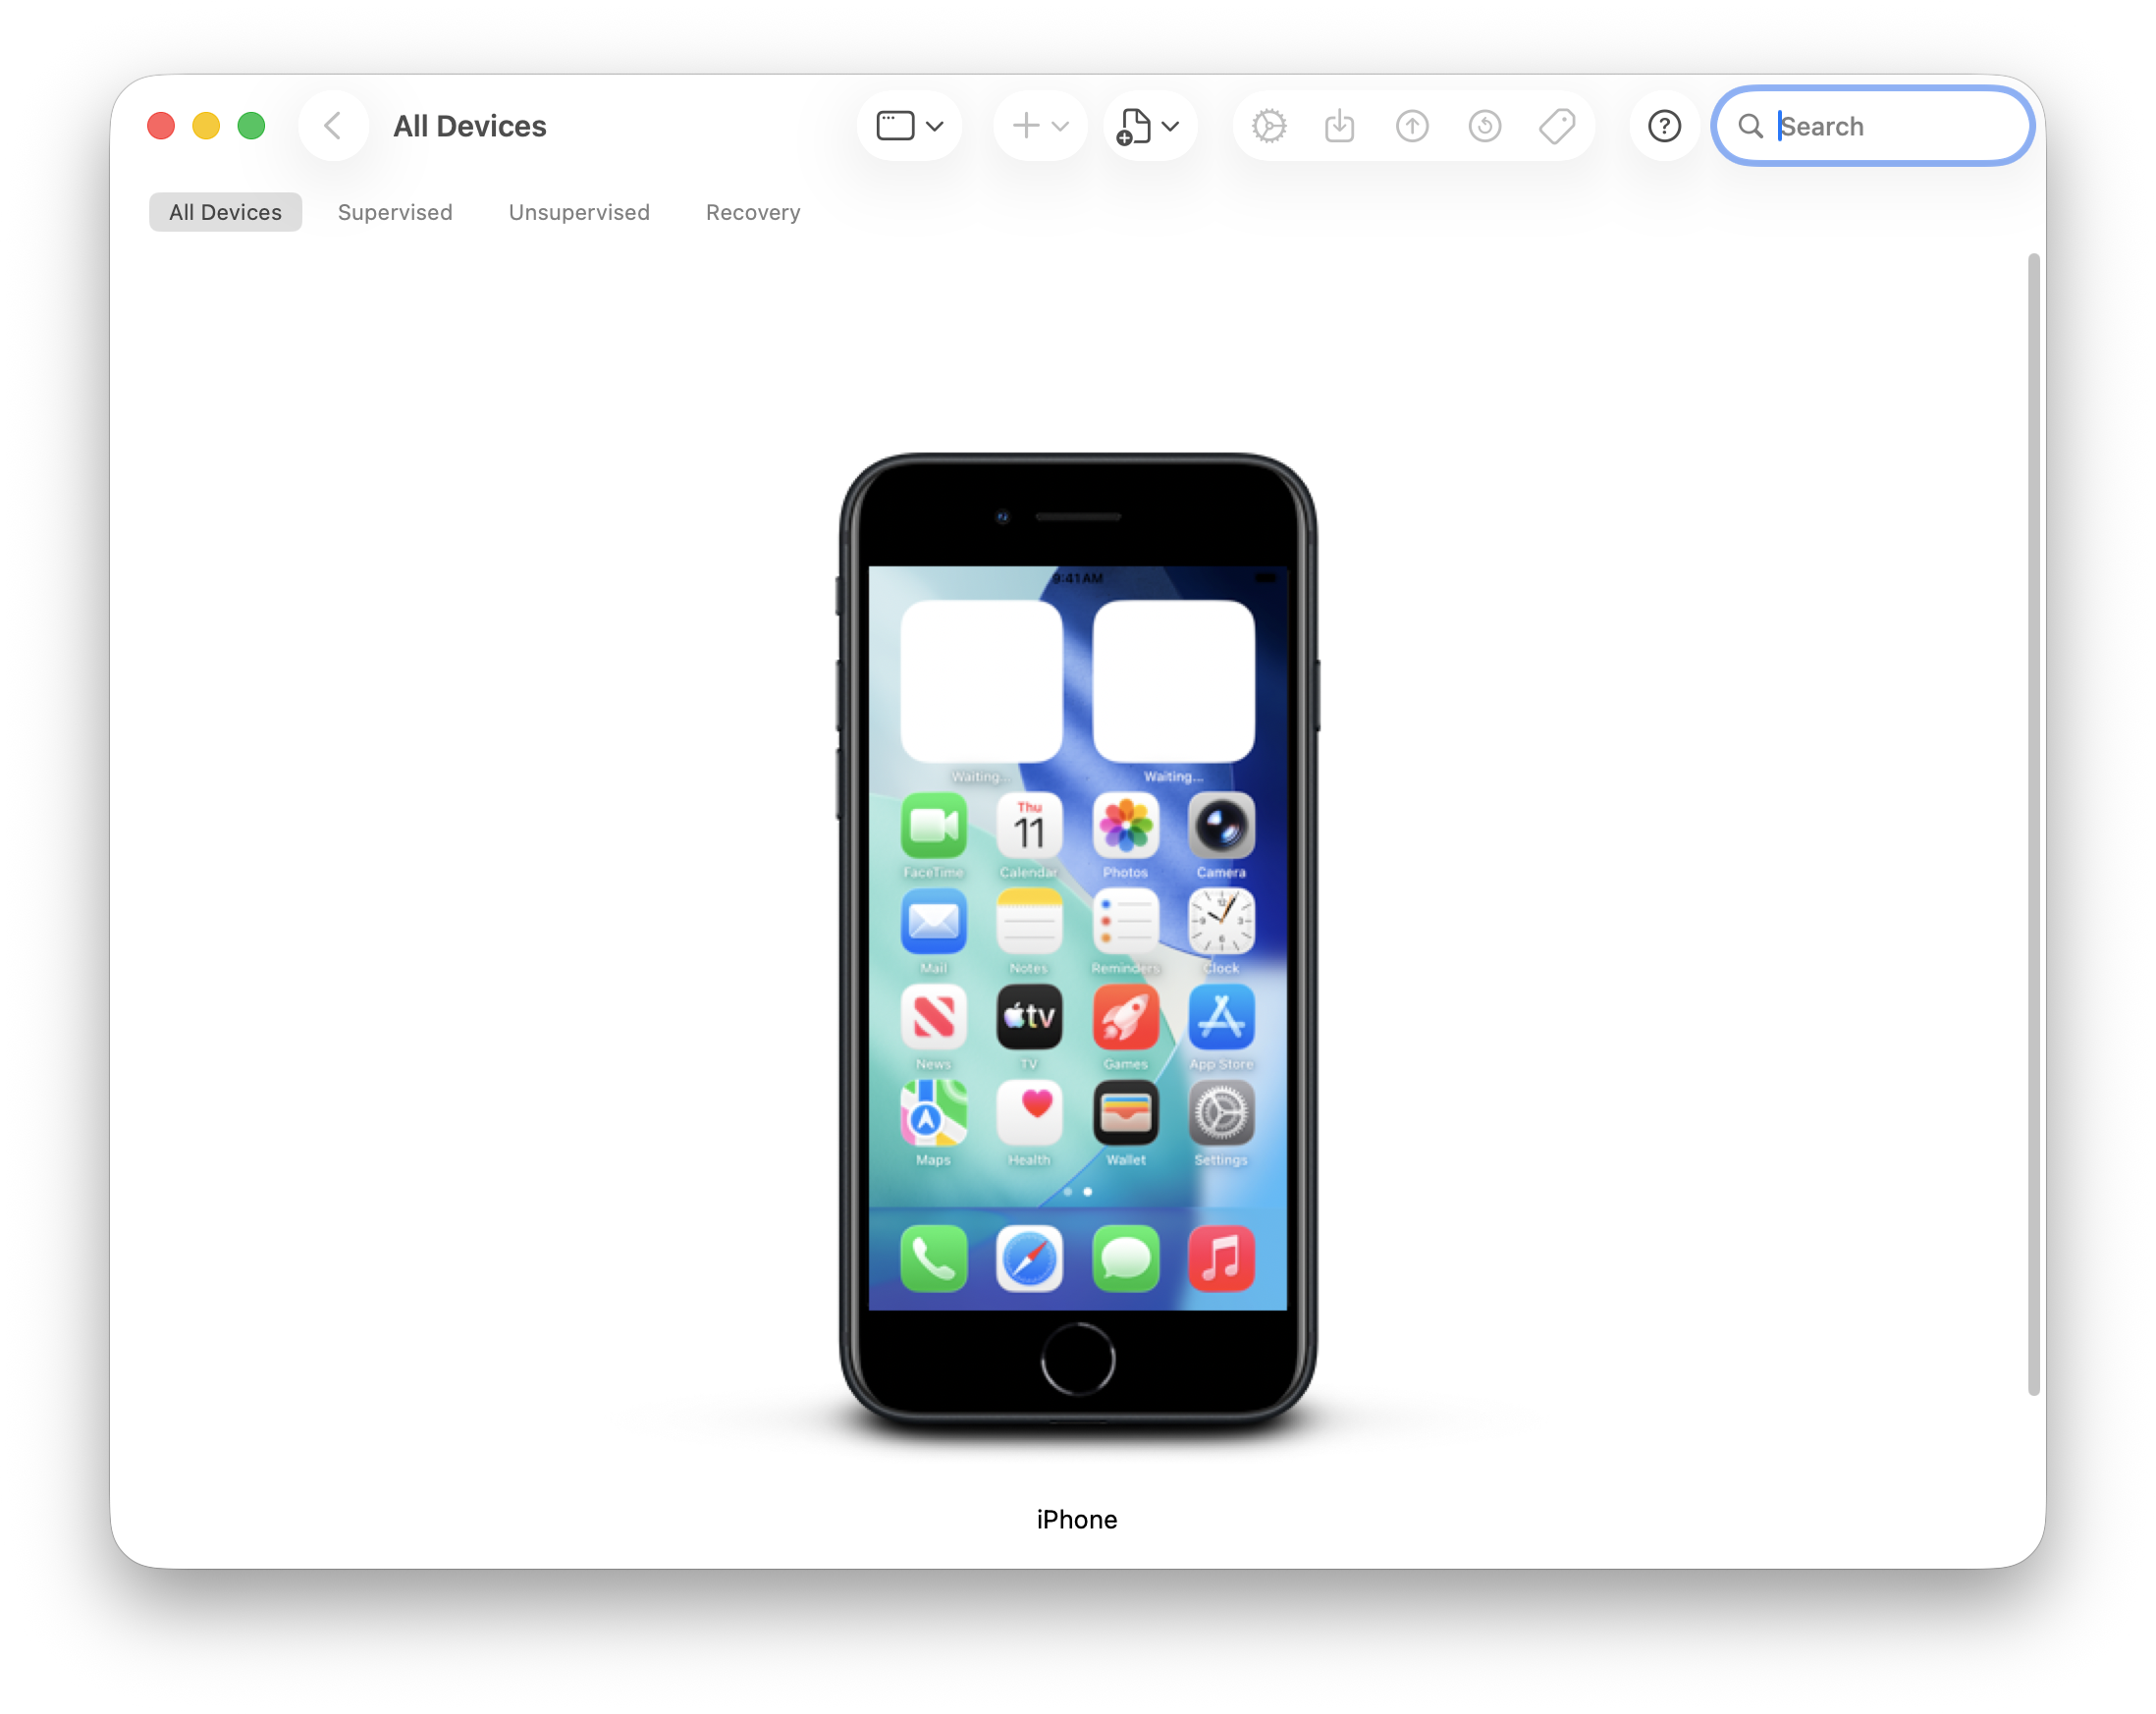
When the preparation is complete you'll see a screen with a new iPhone layout on it. You'll also see the welcome screen on the iPhone itself. The iPhone is now ready to get set up and it's in supervised mode. At this point you can unplug the cable and close Configurator.
-
Now you just walk through the Apple Setup Assistant on the phone like you would with any new phone. You'll sign in with the kid's Apple Account, and around that point Setup Assistant offers to bring over your data. Choose Restore from iCloud Backup to bring everything back. (On a brand-new phone, or a test phone with nothing to restore, you can skip this and set it up clean.)
The restore happens during Setup Assistant, not after. (Setup Assistant is the series of blue and white welcome screens you tap through before you ever see your app icons. Once you're looking at your apps, you've gone too far.) When Setup Assistant offers to restore or transfer your data (right around the Apple Account sign-in), choose Restore from iCloud Backup (or Quick Start from the old phone). Signing into iCloud after you've already reached the home screen is not a restore, you'll land on a blank default layout with none of your apps and have to erase and start the whole thing over. Heads up: Apple renames this screen between iOS versions ("Apps & Data," "Transfer Your Apps & Data," "Restore or Transfer Your Data and Apps") and shuffles where it falls relative to signing in, so don't hunt for one exact title. Just take the restore-from-iCloud option whenever it appears.
"iPhone Partially Set Up"? Tap "Continue with Partial Setup," not "Erase and Start Over." This screen is normal right after a Configurator supervise, not a sign anything went wrong. Because the phone was just restored and prepared over the cable, iOS sometimes thinks its setup is half-finished. Continue with Partial Setup lets you finish onboarding with supervision intact. Erase and Start Over wipes the phone and strips the supervision you just applied, dropping you back at square one in Configurator. Unplugging the phone the moment Configurator says it's done makes this less likely to show up.
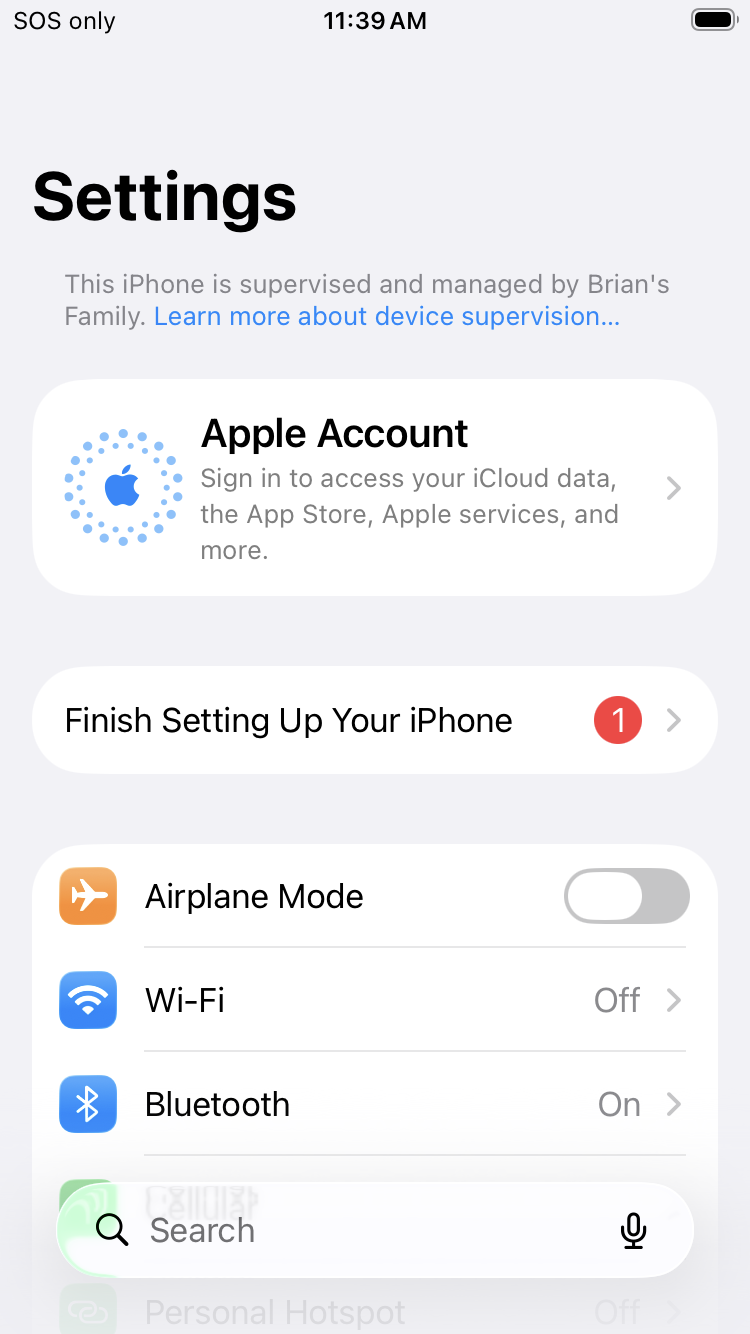
Congratulations! Your kid's phone is now supervised! Much of the restore process happens in the background, so it may take a while for all of the photos, notes, iMessages and apps to come back, but it will look and feel the same as it did before the supervision, with the added benefit of adding controls in the next steps of this guide. You can open the settings app on the phone to see the supervised message at the top.
Step 3 of 7
Sign up for an MDM (SimpleMDM)
about 20 min
- Create a SimpleMDM account (about $4/month; I landed there after testing Mosyle).
- SimpleMDM needs a one-time permission slip from Apple (it's called a push certificate) before it can send commands to the phone. SimpleMDM walks you through it right on screen, on a "Just one more step" page; you mostly just click through and move a couple of files between two websites. Don't worry about the file names:
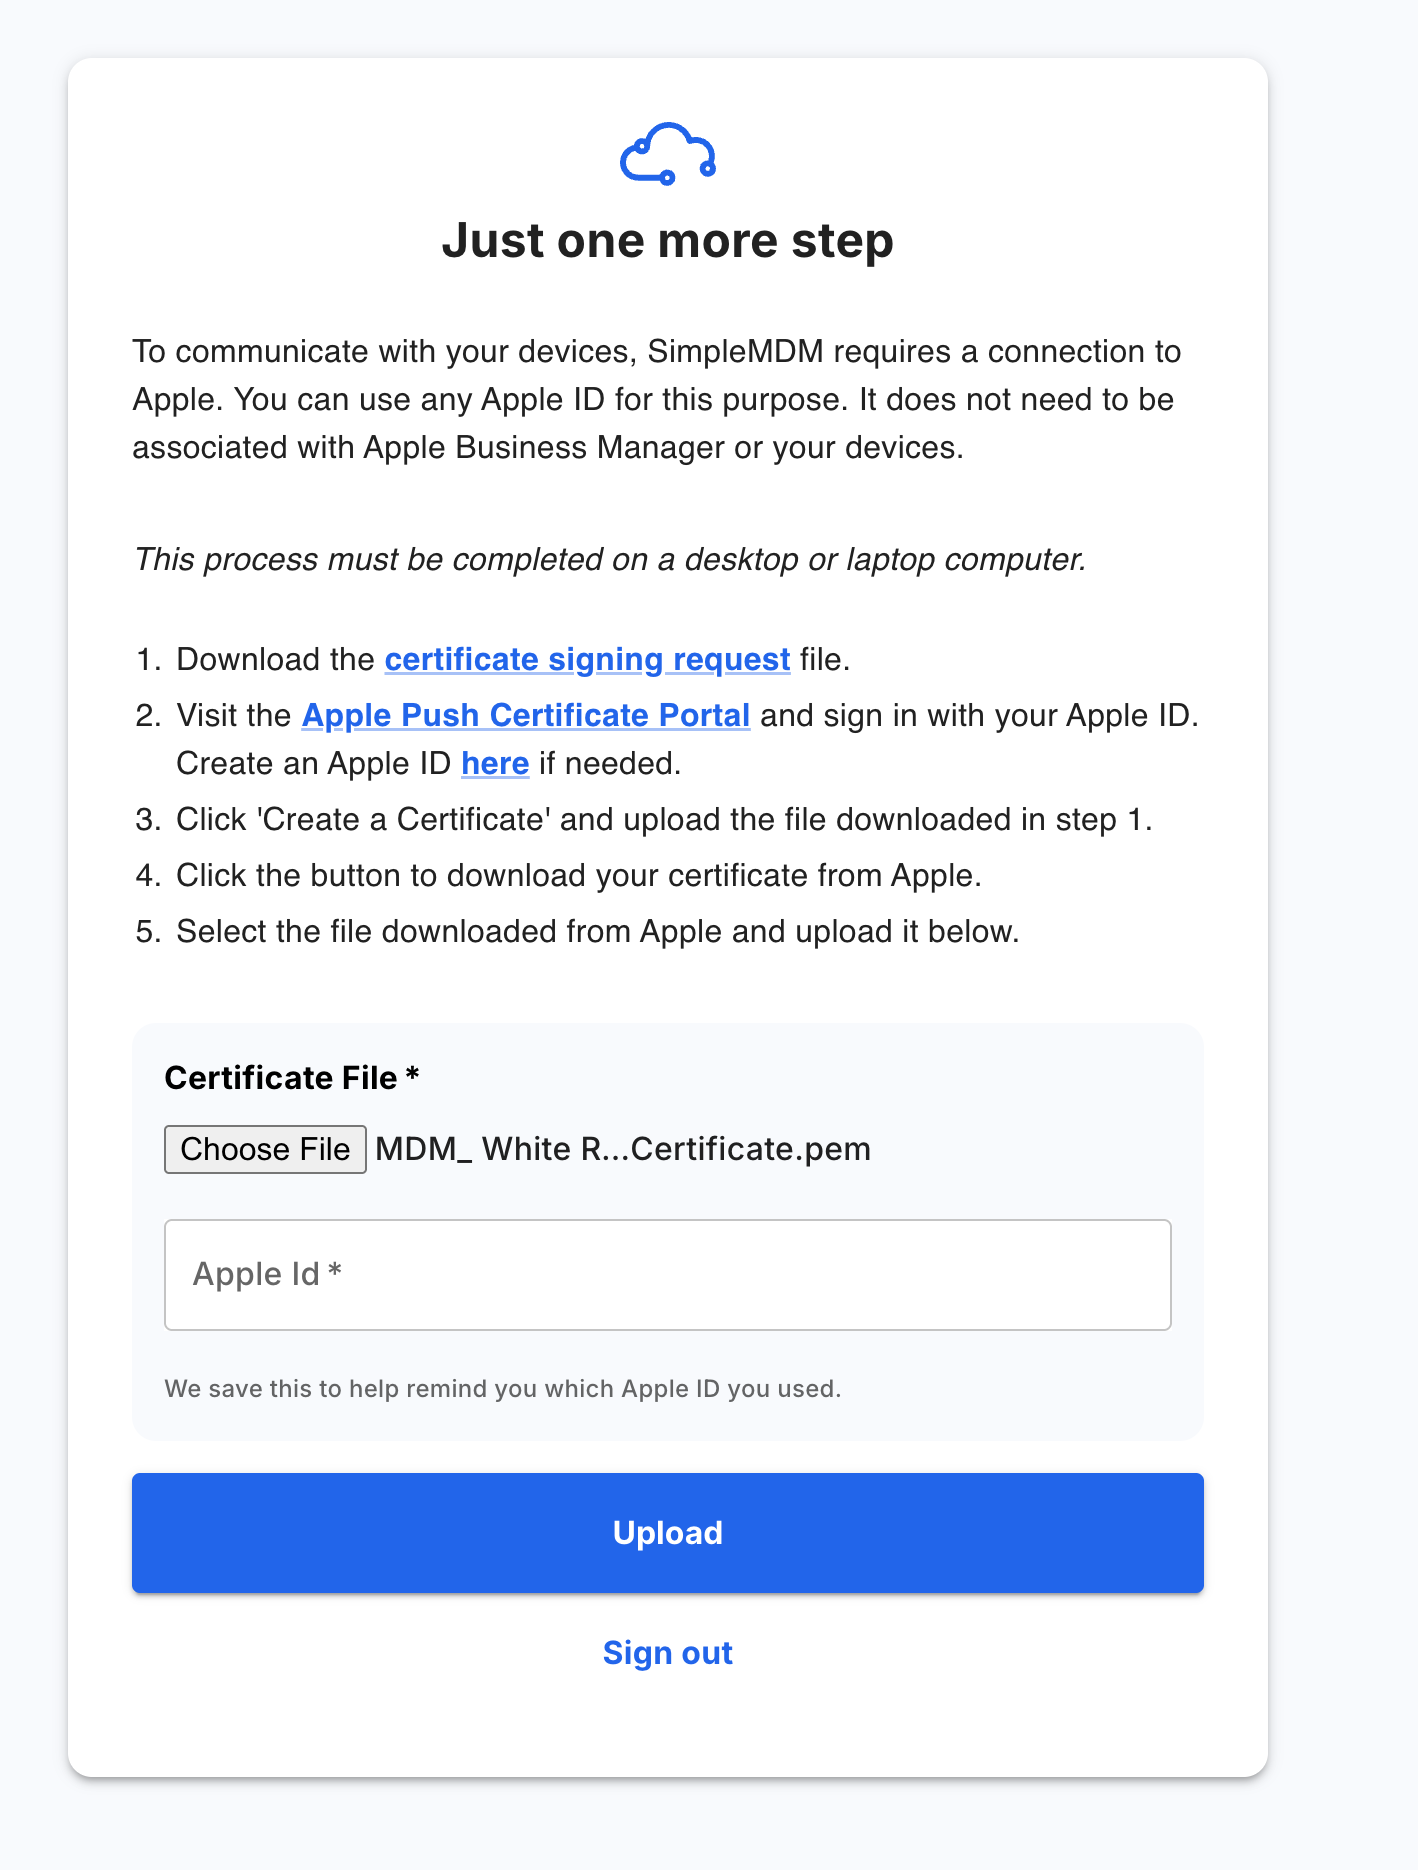
- On SimpleMDM: click the link to download a file (it's labeled a "certificate signing request," but the name doesn't matter). Then open the Apple Push Certificates Portal and sign in with your Apple ID.
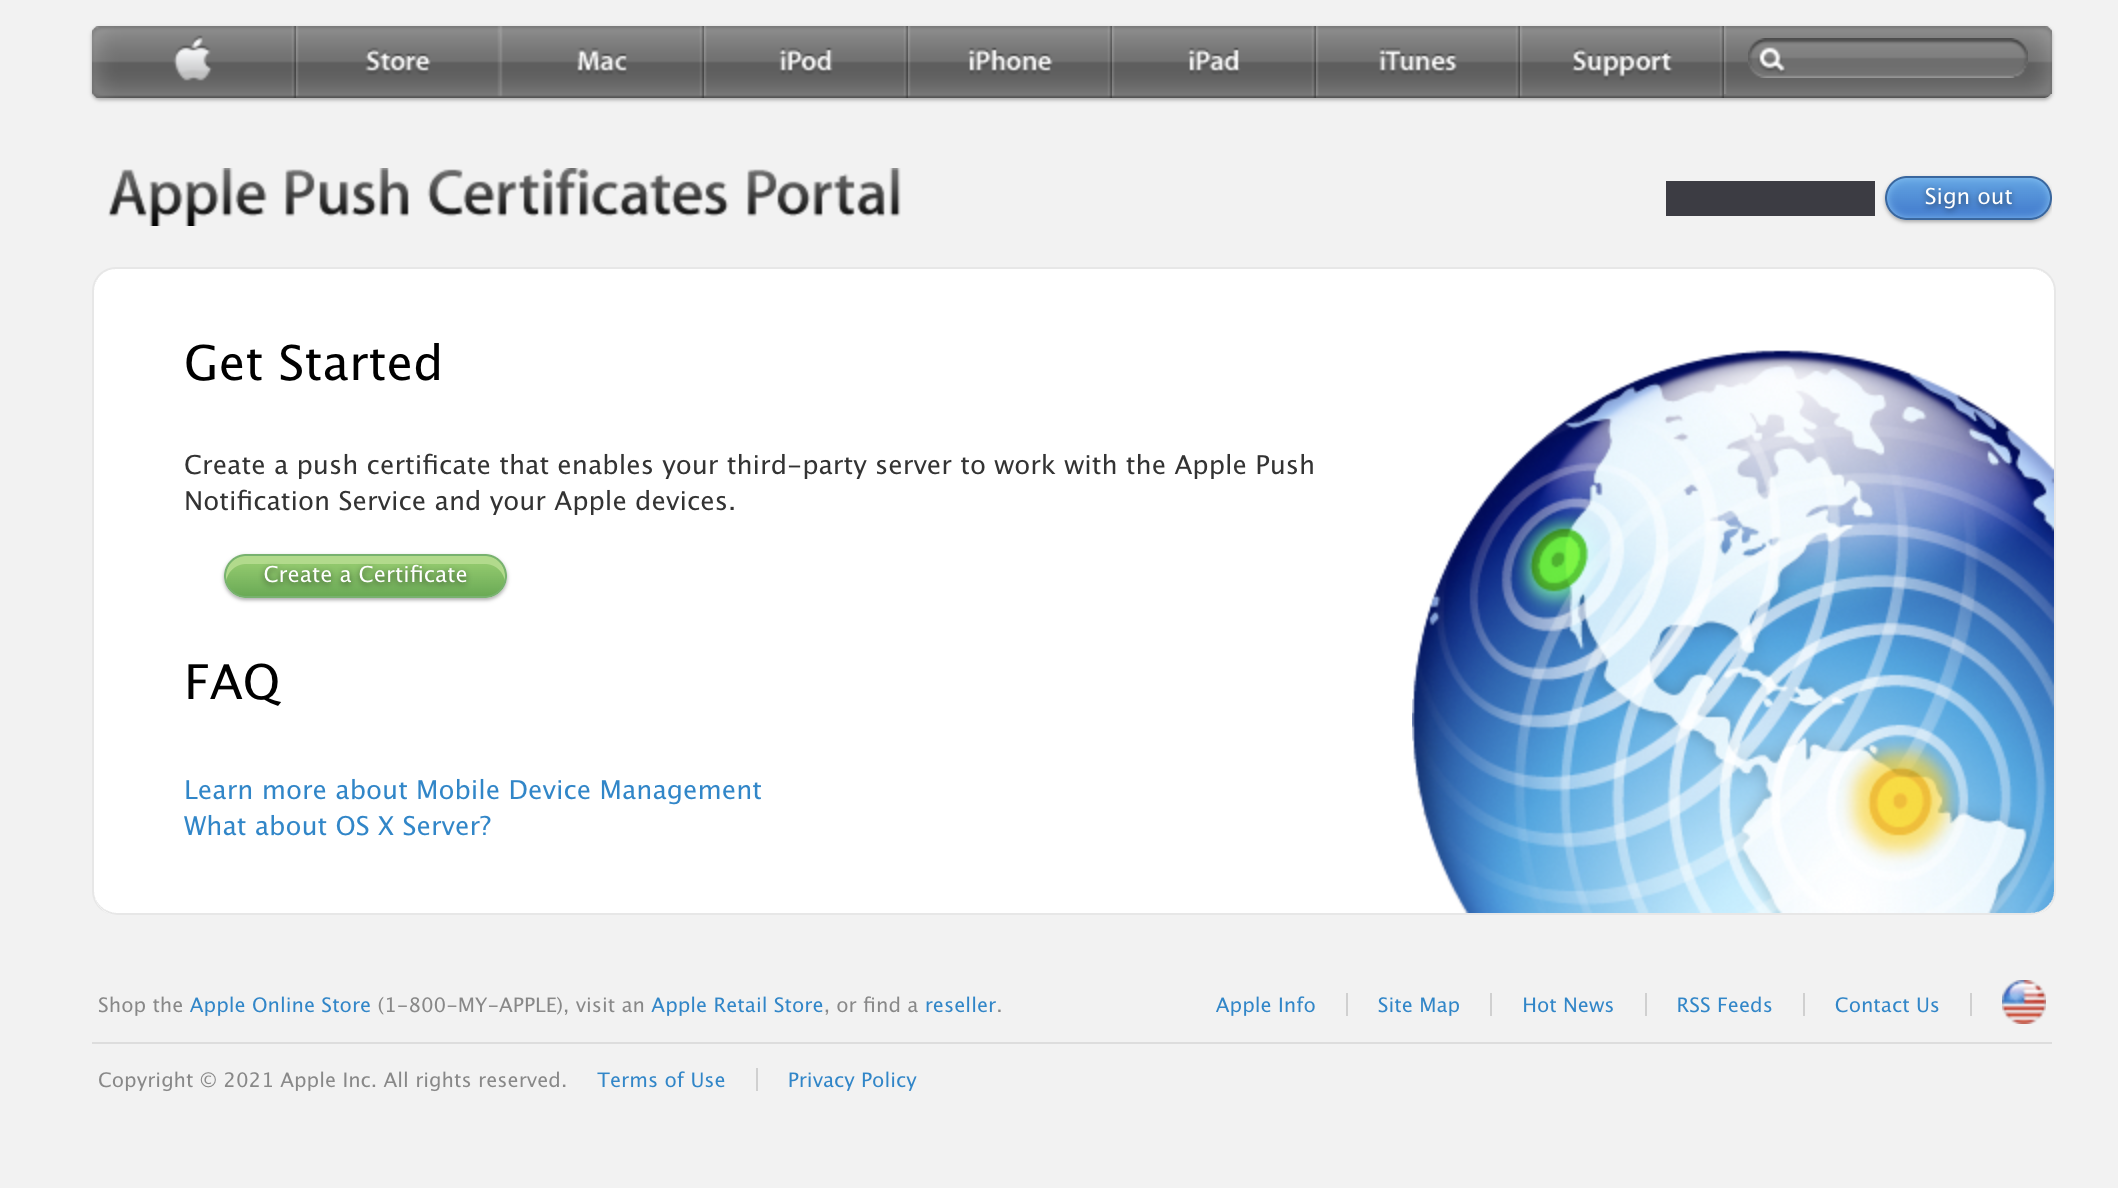
- On Apple's page: click Create a Certificate and upload the exact file you just downloaded. Apple hands you back a new file, download that one.
- Back on SimpleMDM: choose that new file under Certificate File, type the Apple ID you used (SimpleMDM saves it to remind you at renewal), and click Upload. That's the whole hand-off.
Step 4 of 7
Enroll the supervised phone
about 10 min
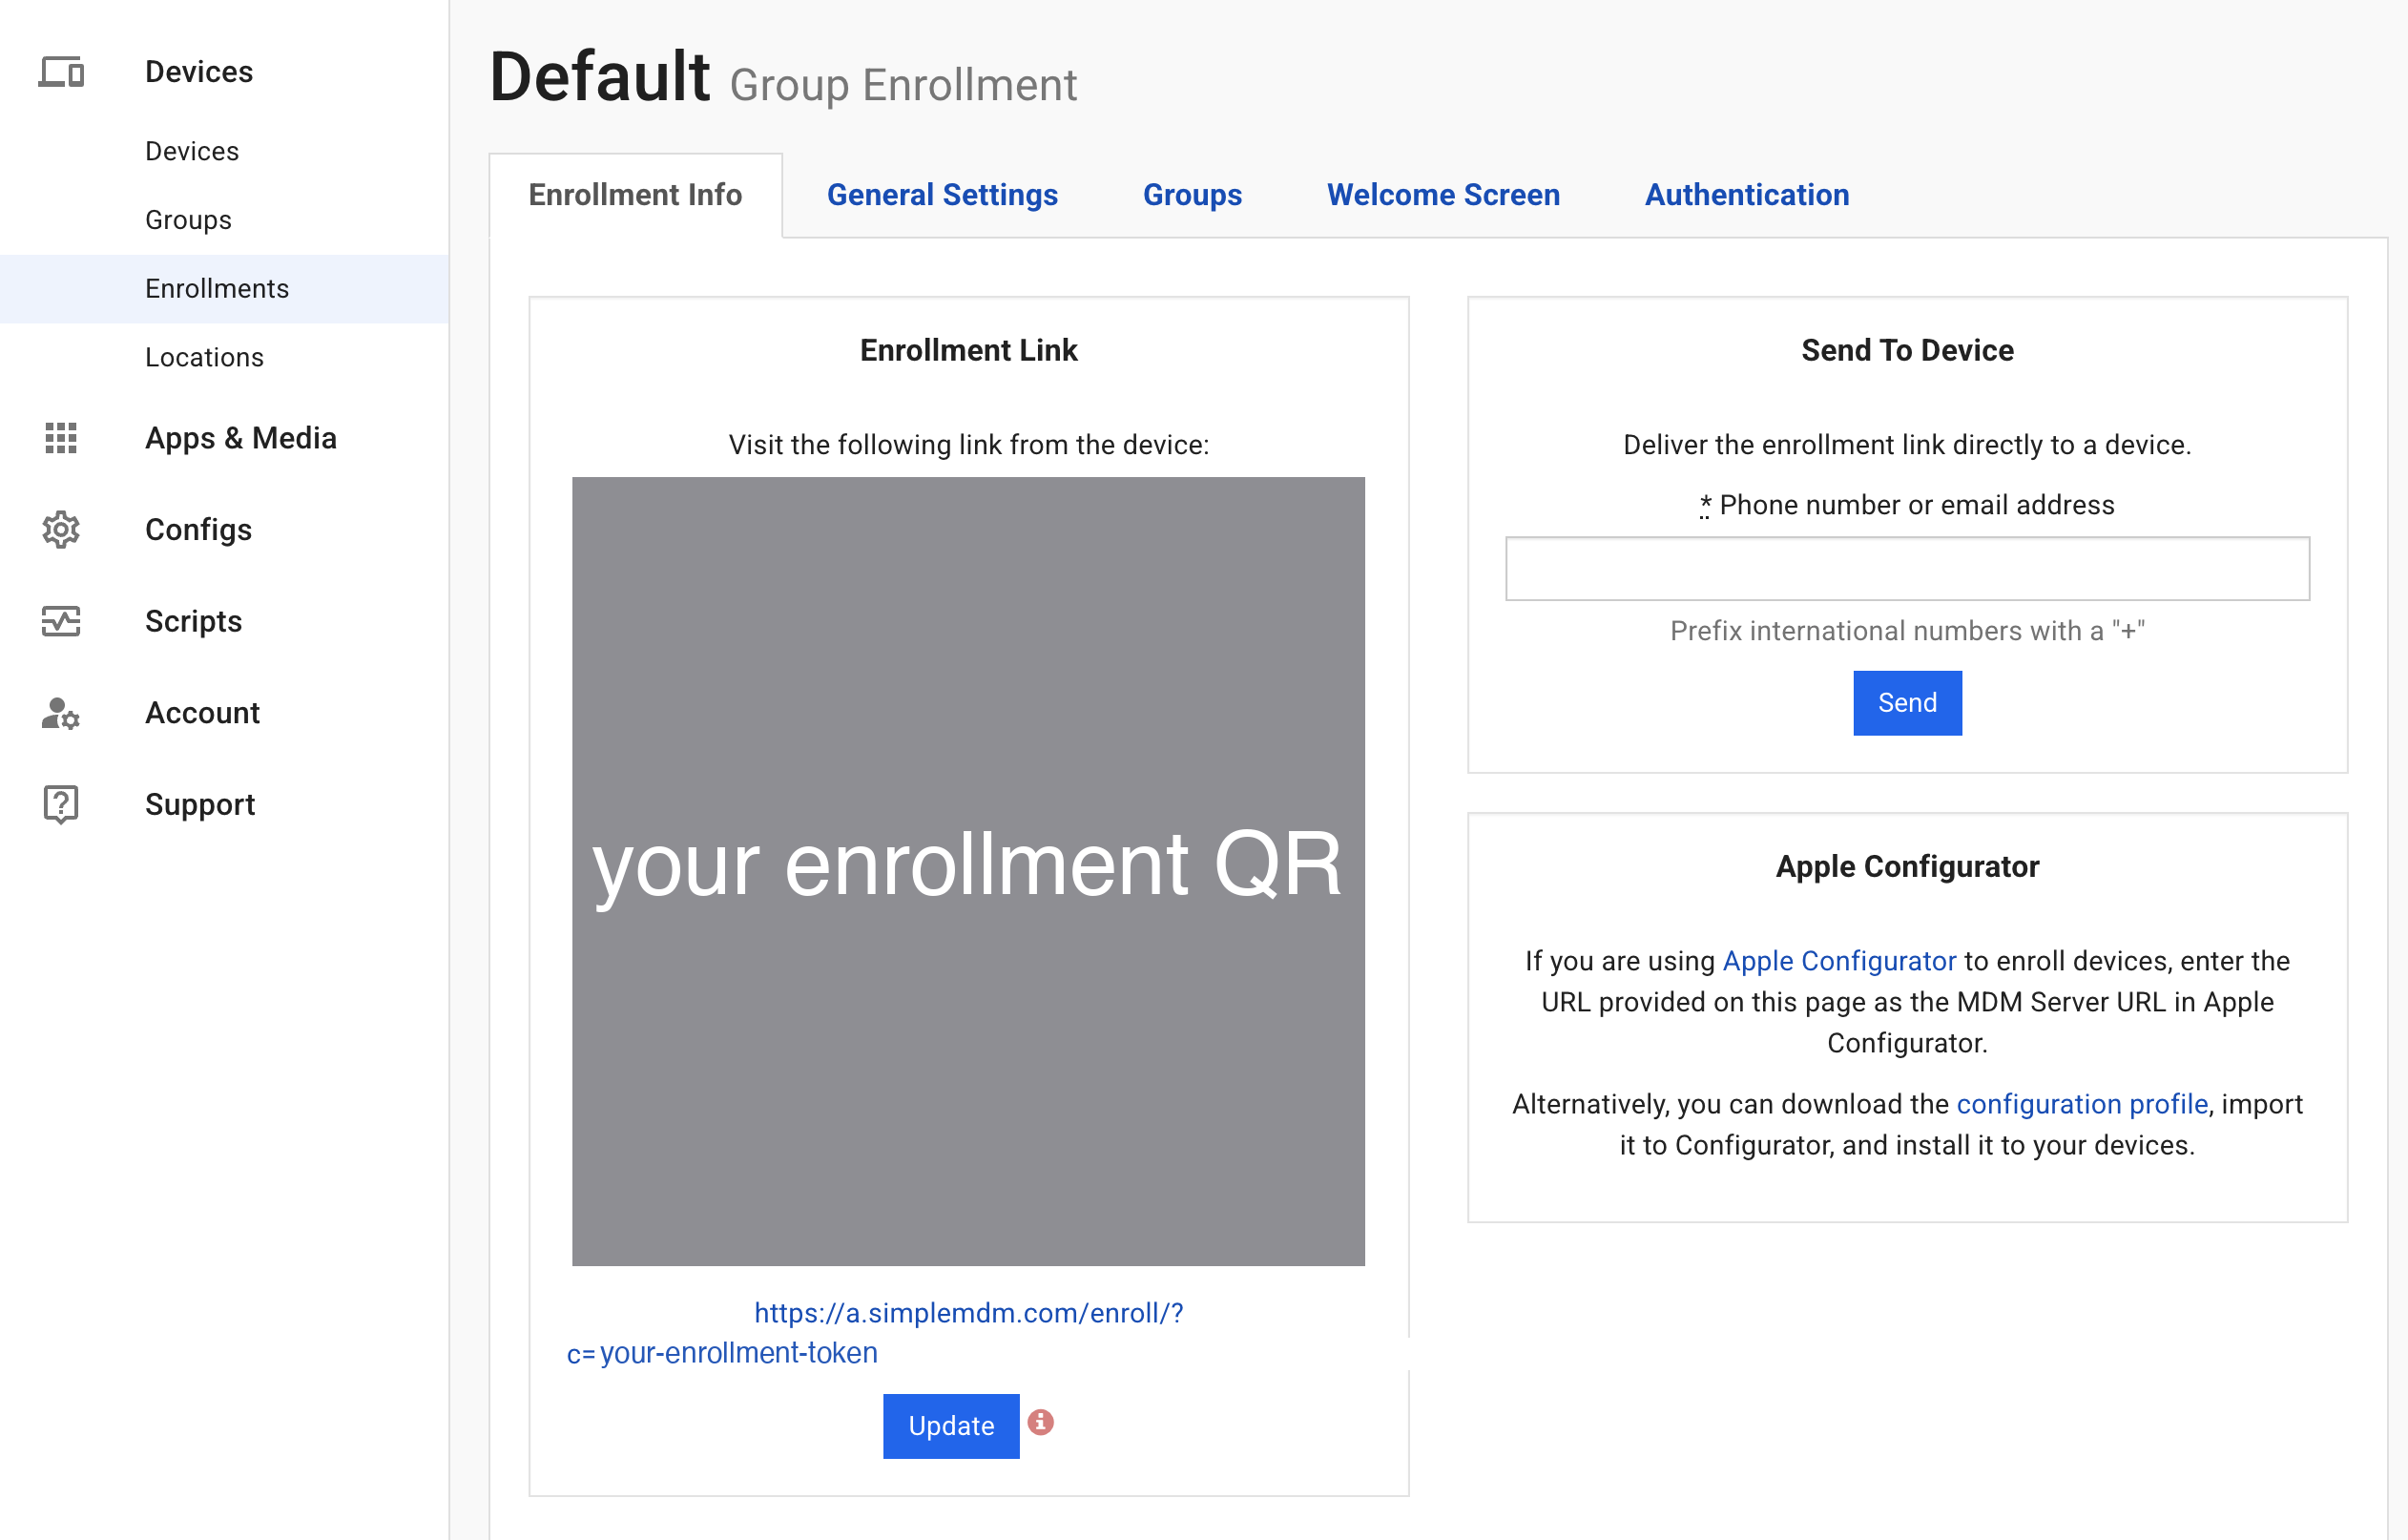
- In SimpleMDM, go to Devices → Enrollments. SimpleMDM already created a Default group enrollment, so there's nothing to set up here.
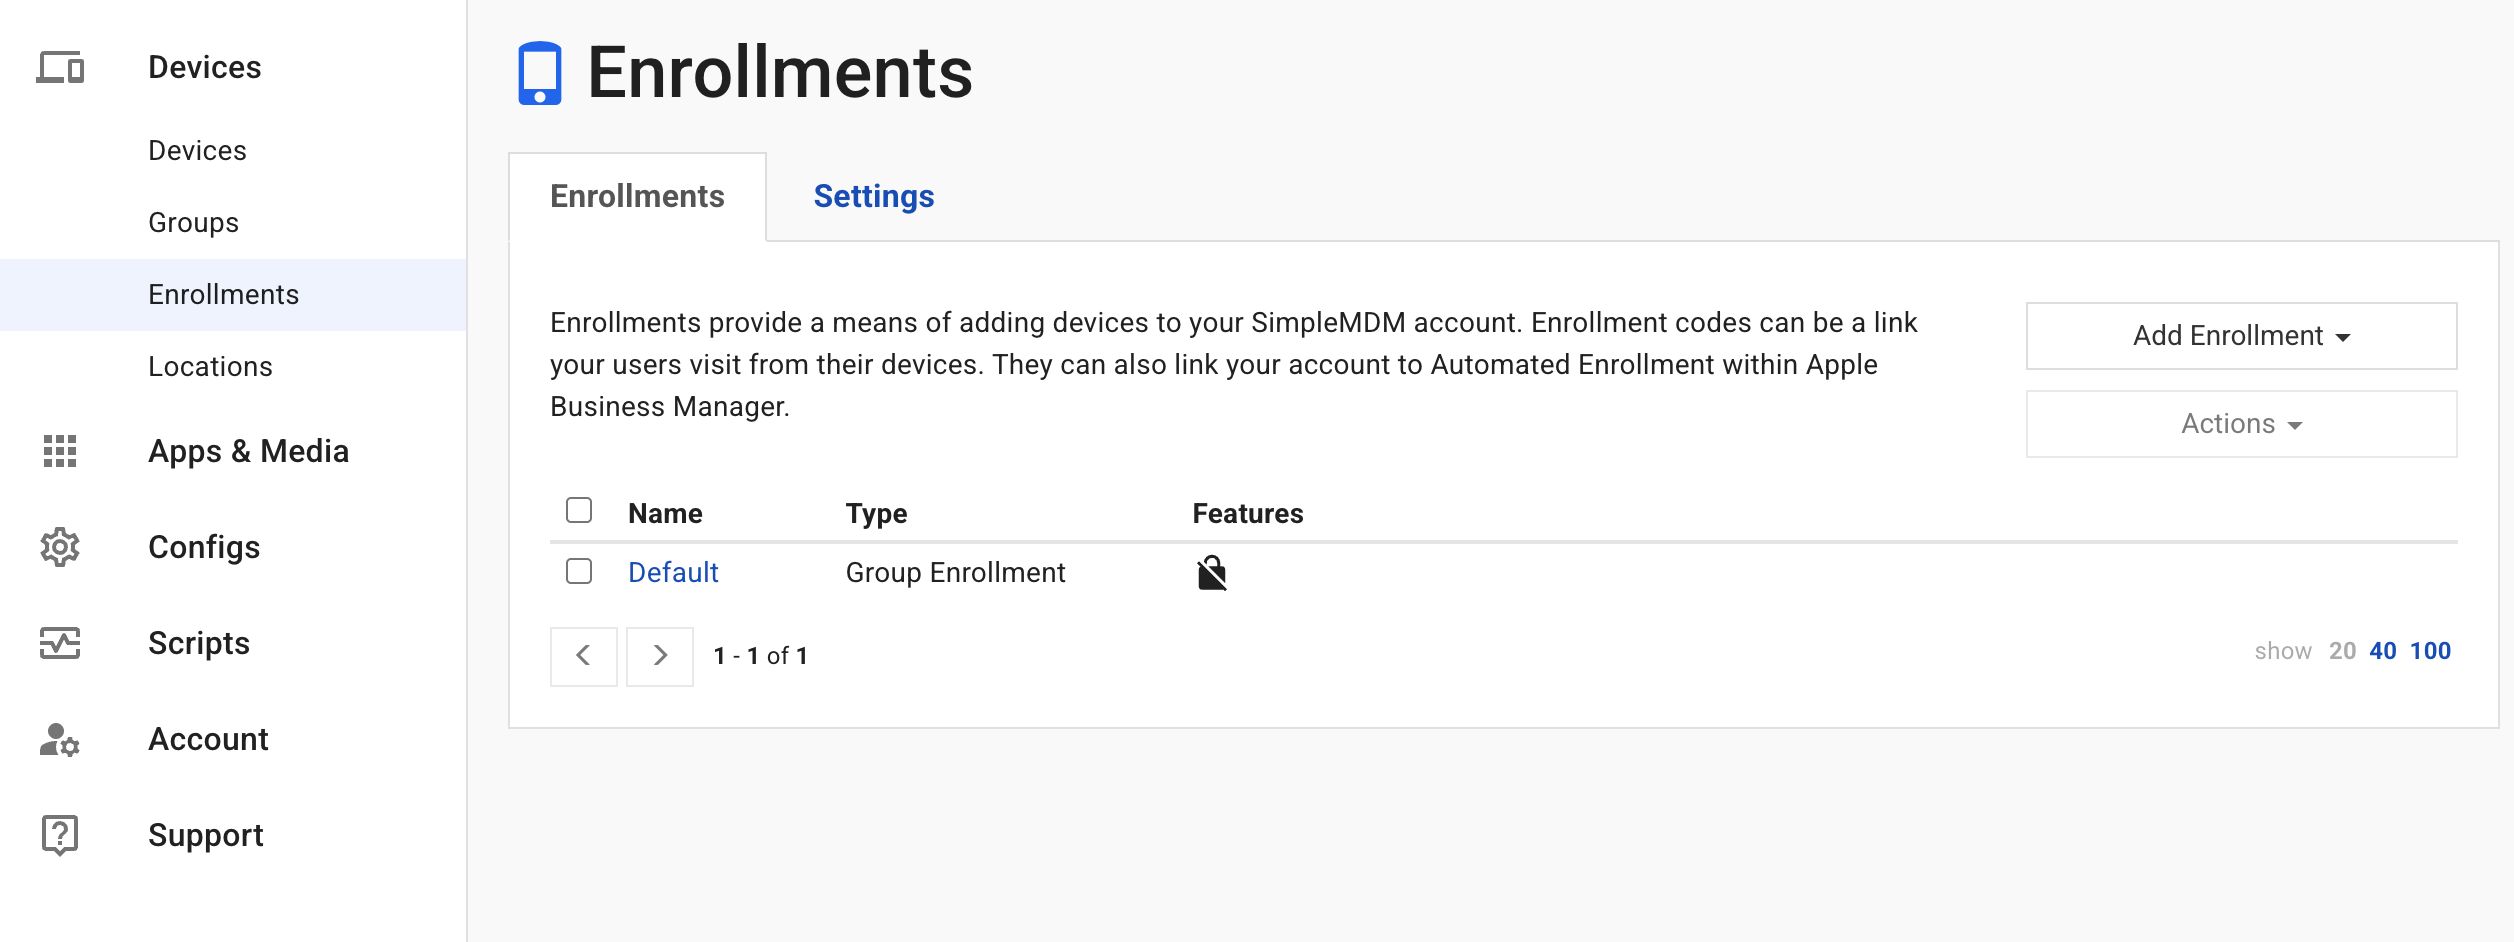
- Click Default to open it. The Enrollment Info tab shows a QR code and the enrollment link. On the kid's phone, open the Camera app and point it at the QR, then tap the link that appears.
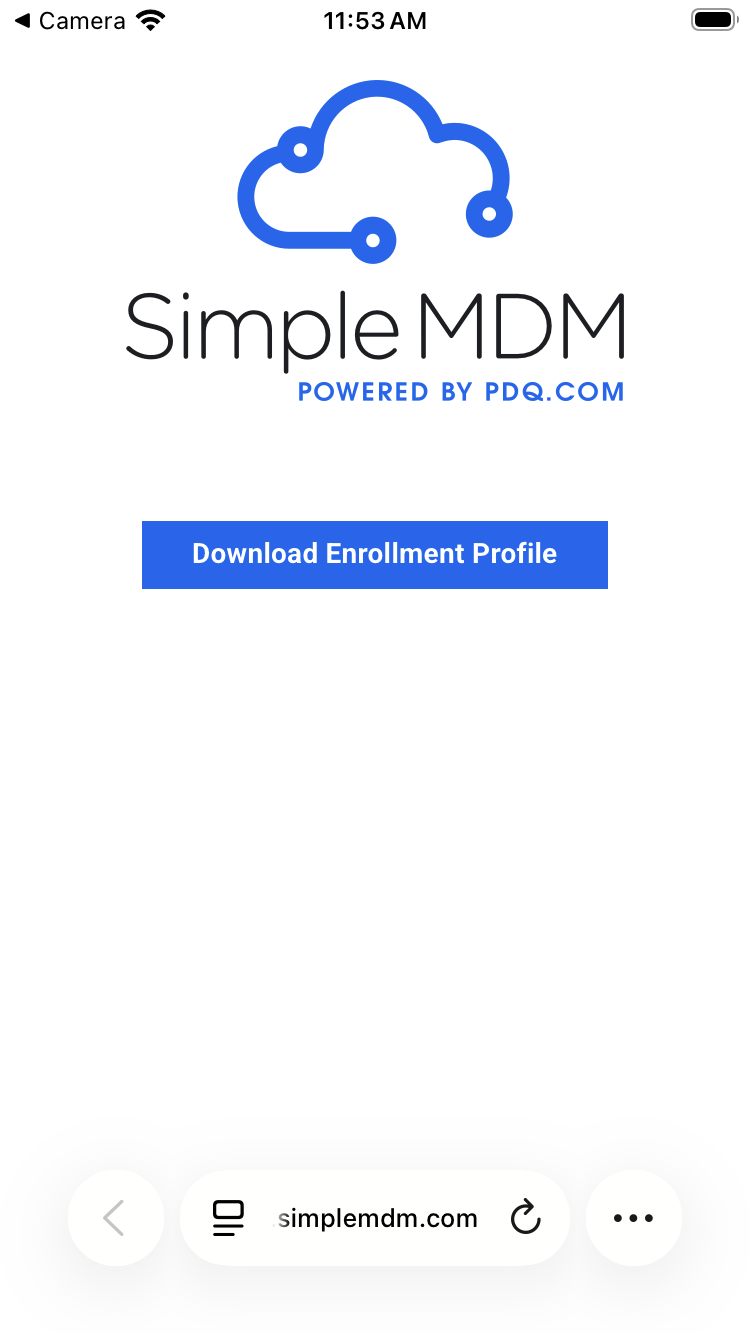
- The link opens a SimpleMDM page with a Download Enrollment Profile button. Tap it.
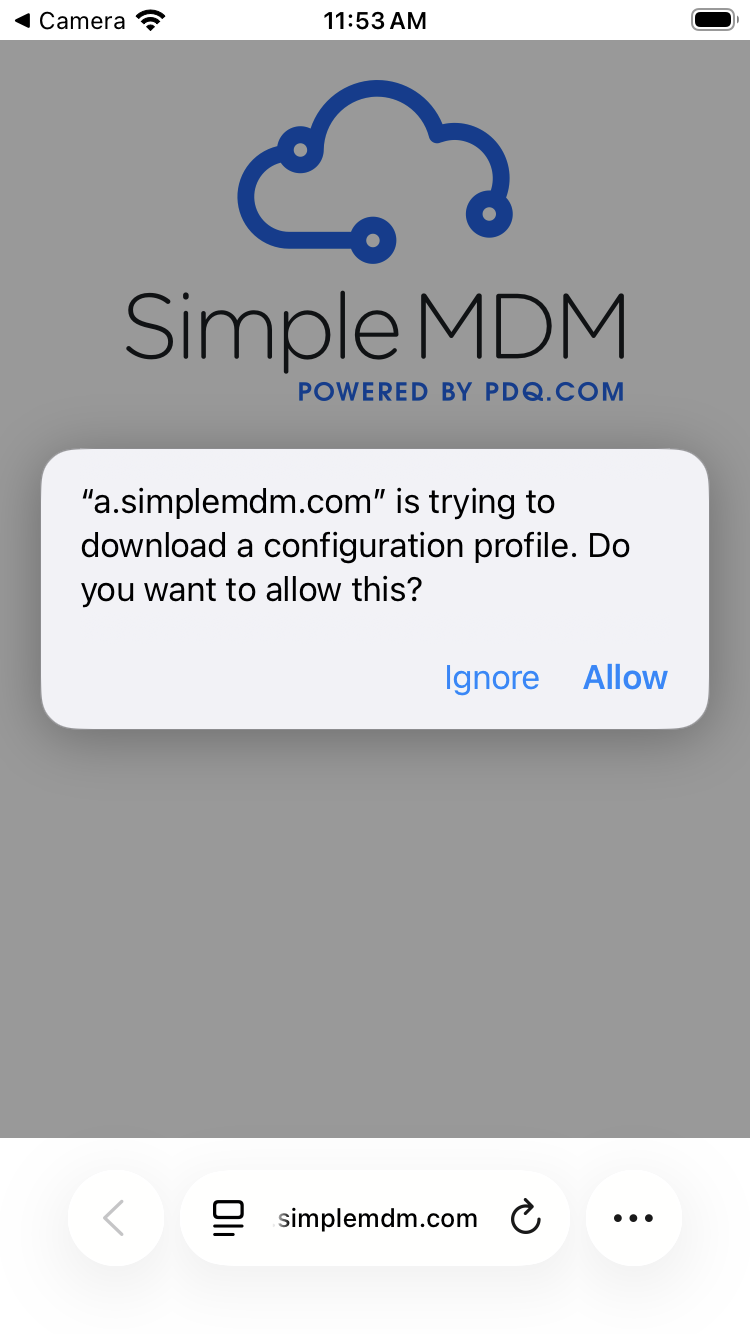
- Tap Allow when the phone asks whether to download a configuration profile.
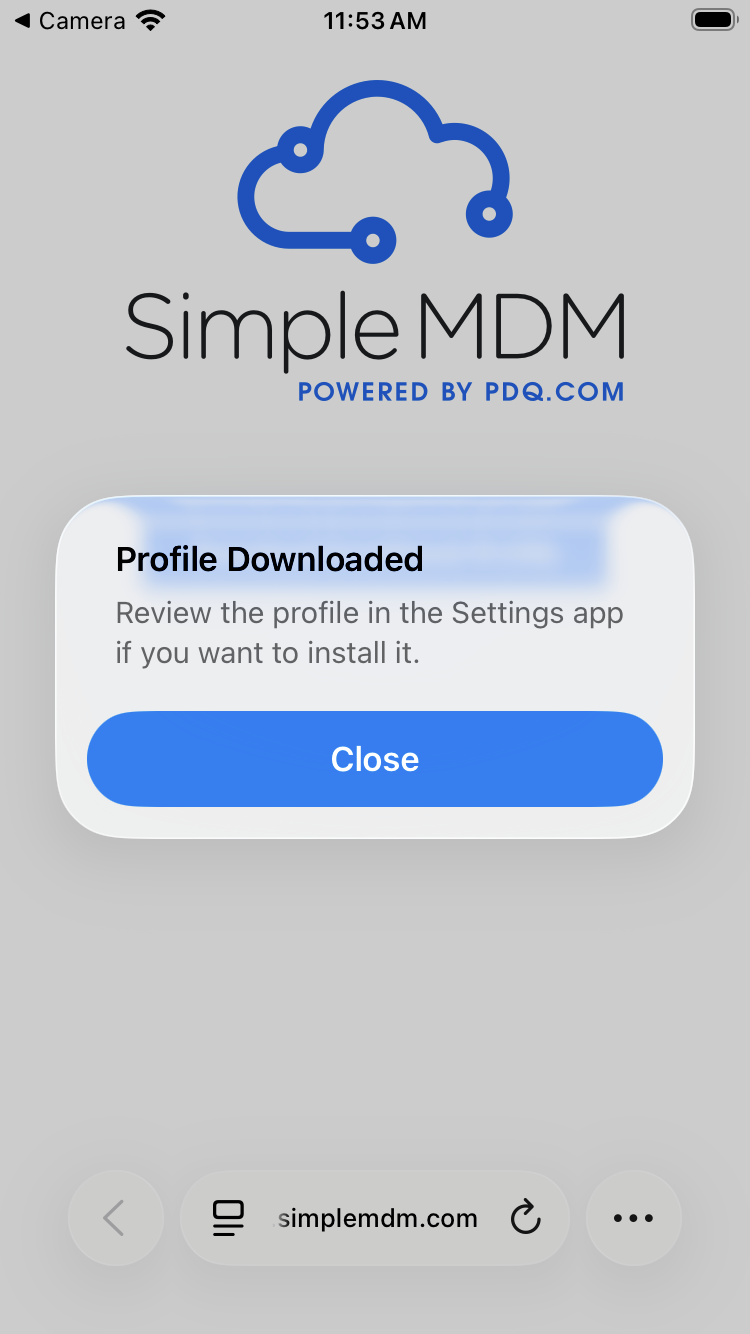
- A Profile Downloaded message appears. Tap Close.
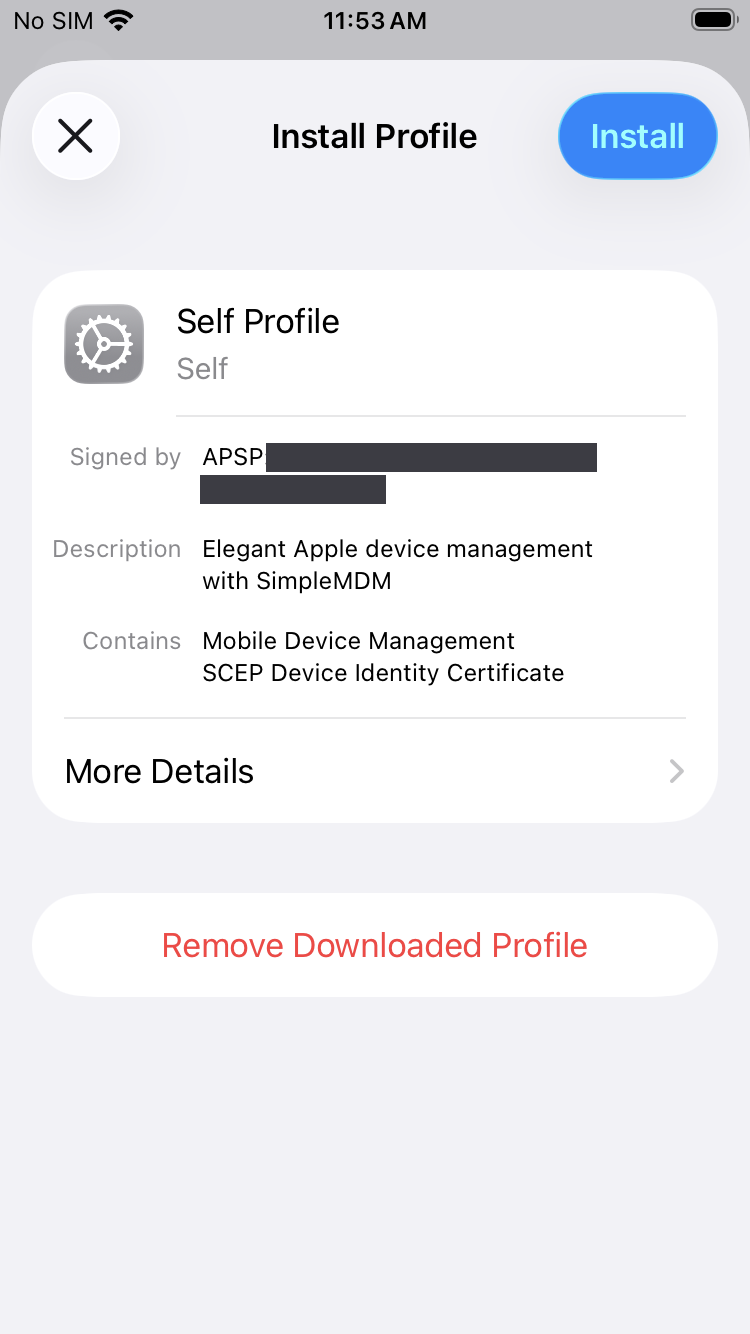
- Open the Settings app. Near the top is a Profile Downloaded row (with a banner noting the phone is supervised and managed). Tap it.

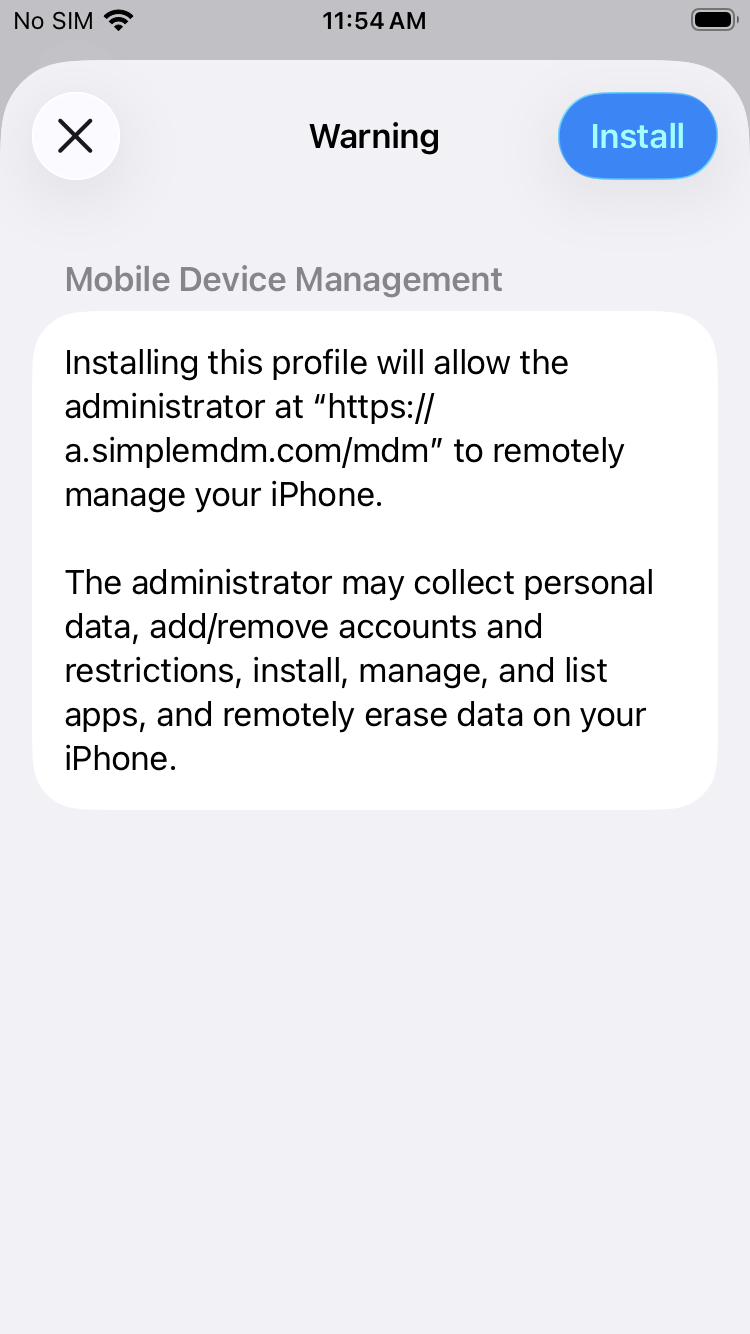
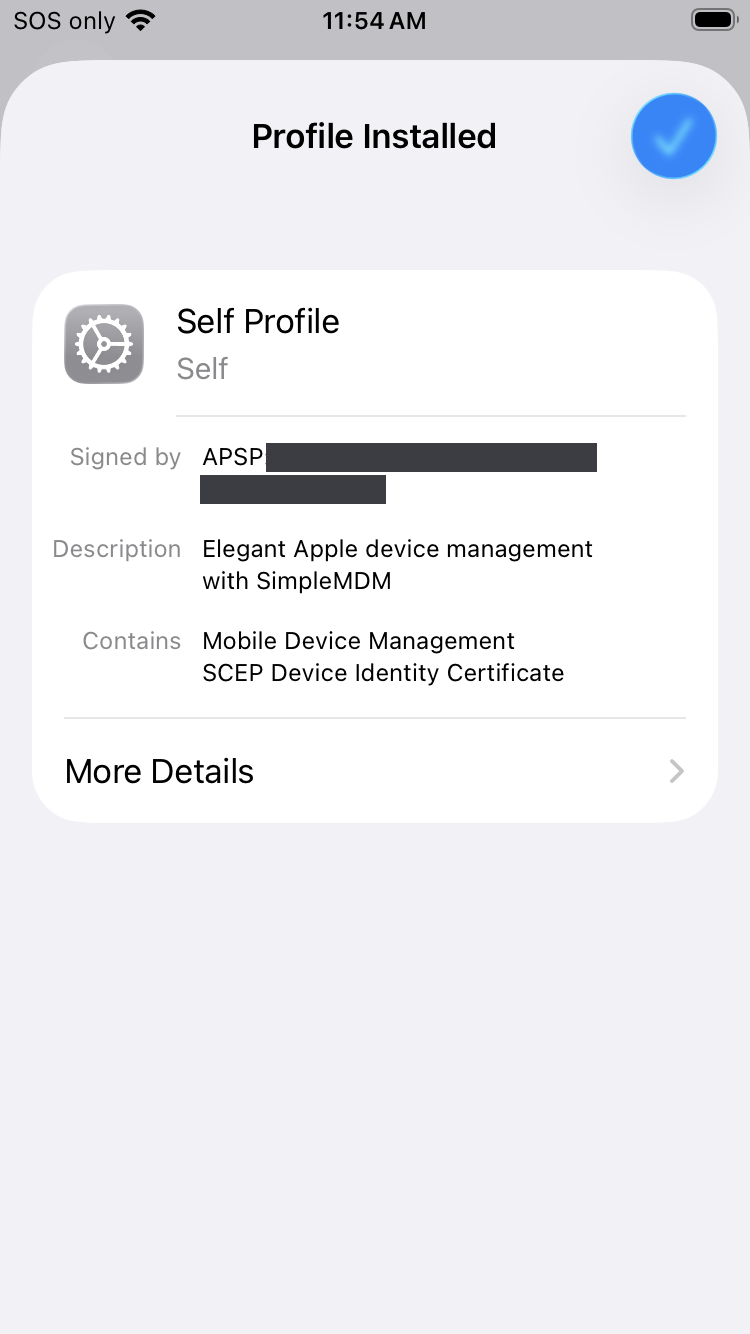
- Tap Install (top right), enter the phone's passcode if asked, then tap Install again on the Warning screen that explains the MDM can manage the phone. You'll land on Profile Installed.
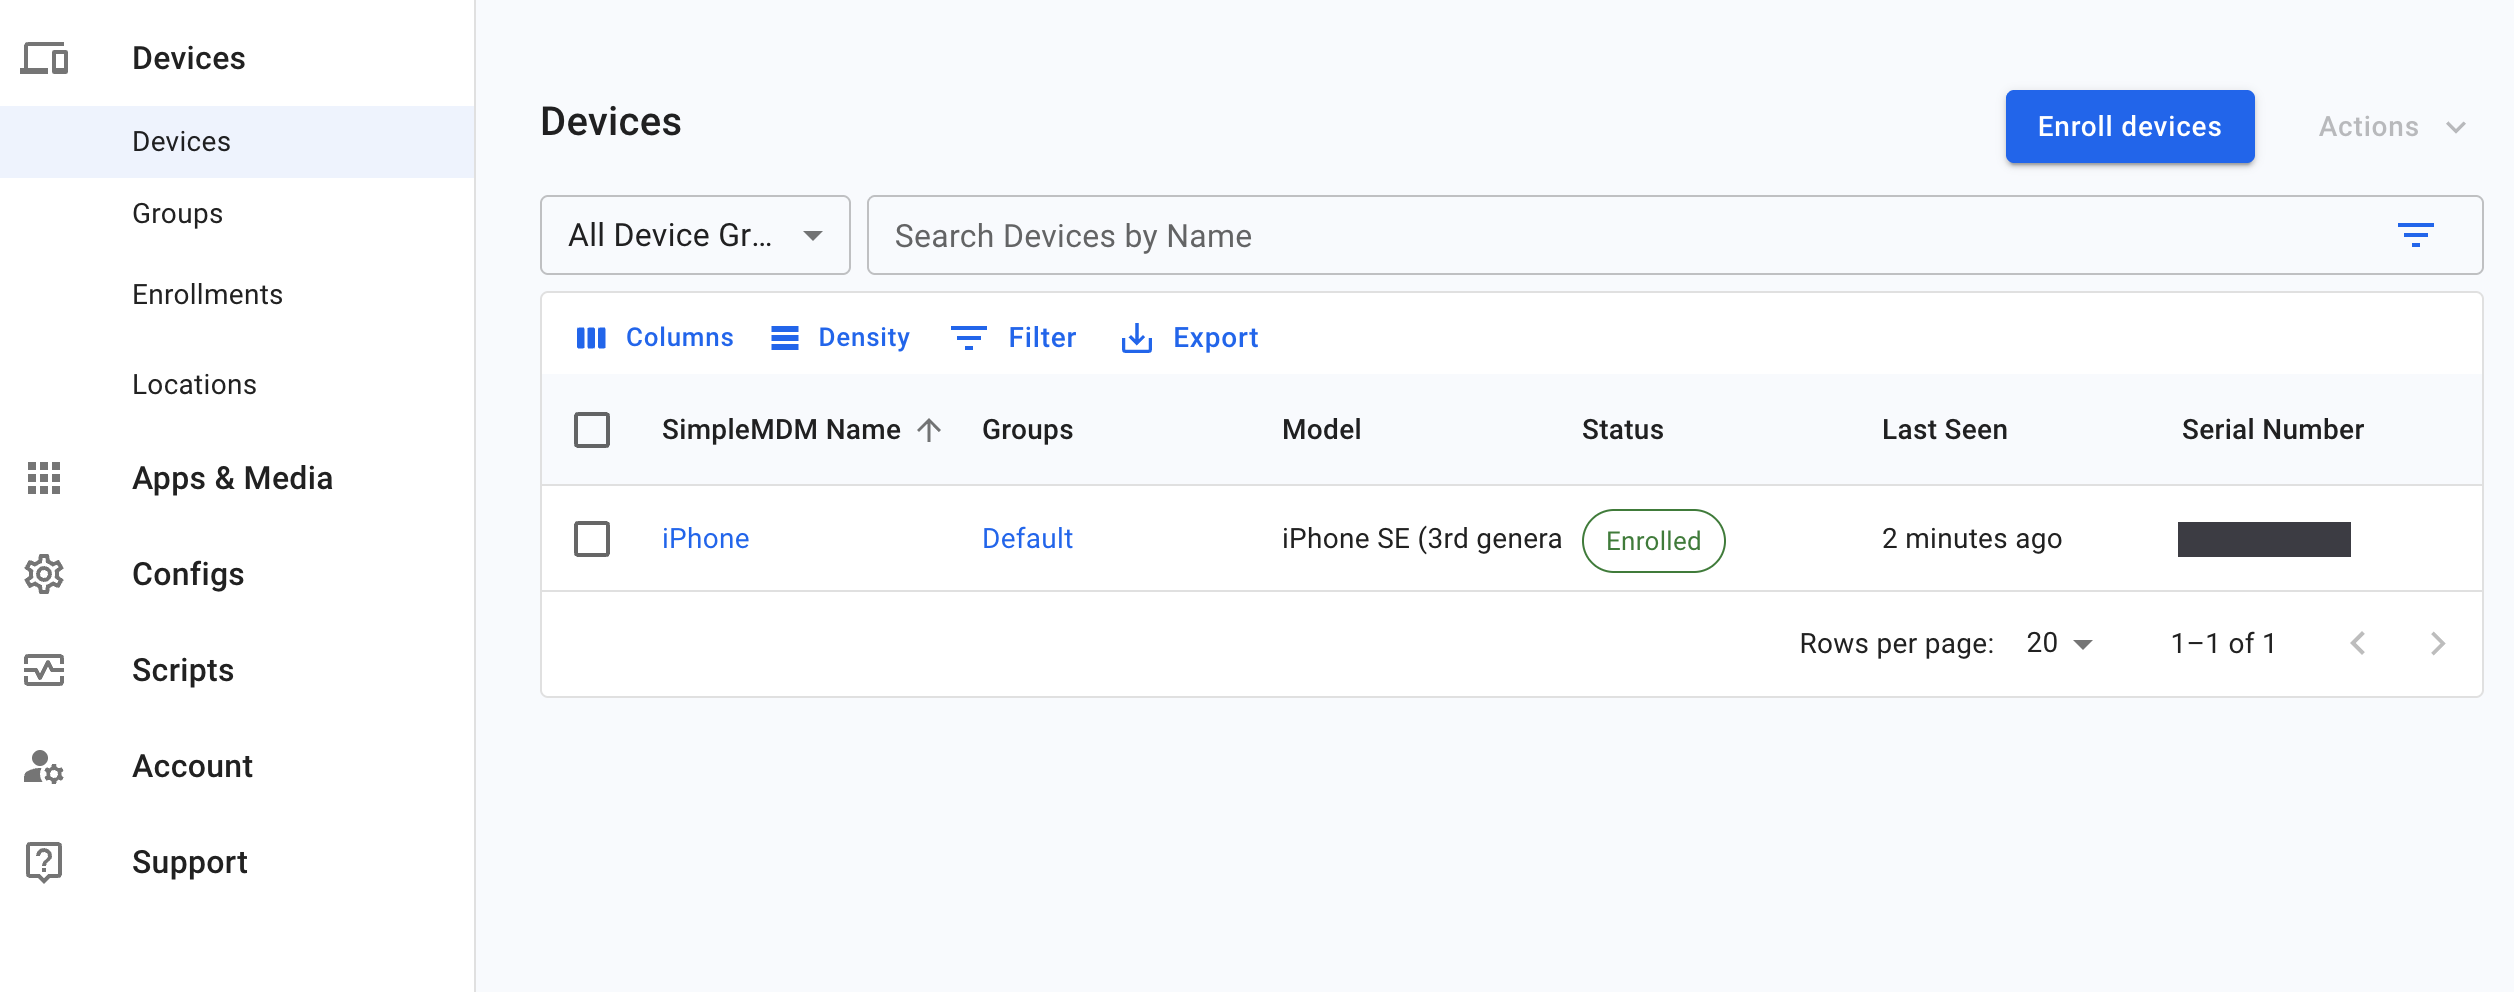
- Back in SimpleMDM under Devices → Devices, the phone appears with a green Enrolled status, in the Default device group. (It may briefly read "awaiting enrollment" until it checks in.) Assign the profiles you build next to that group, or to the device directly, and they push automatically.
Once it's enrolled and supervised, restrictions actually enforce.
BrianThis was the moment it clicked for me. I blocked the camera from my laptop and watched the icon disappear off the phone in seconds, then blocked a test domain and saw it fail to load instantly. After months of Screen Time guesswork, seeing a command just land was a little jarring.Step 5 of 7
Build your restrictions and profiles
about 15 min
This is where supervision turns into actual rules. In SimpleMDM, rules live in profiles (under Configs → Profiles) that you create once and then assign to the phone or to its device group. Here's the whole pattern, using a Block Apps profile as the worked example:
- Go to Configs → Profiles and click Create Profile. (A new account starts with none.)
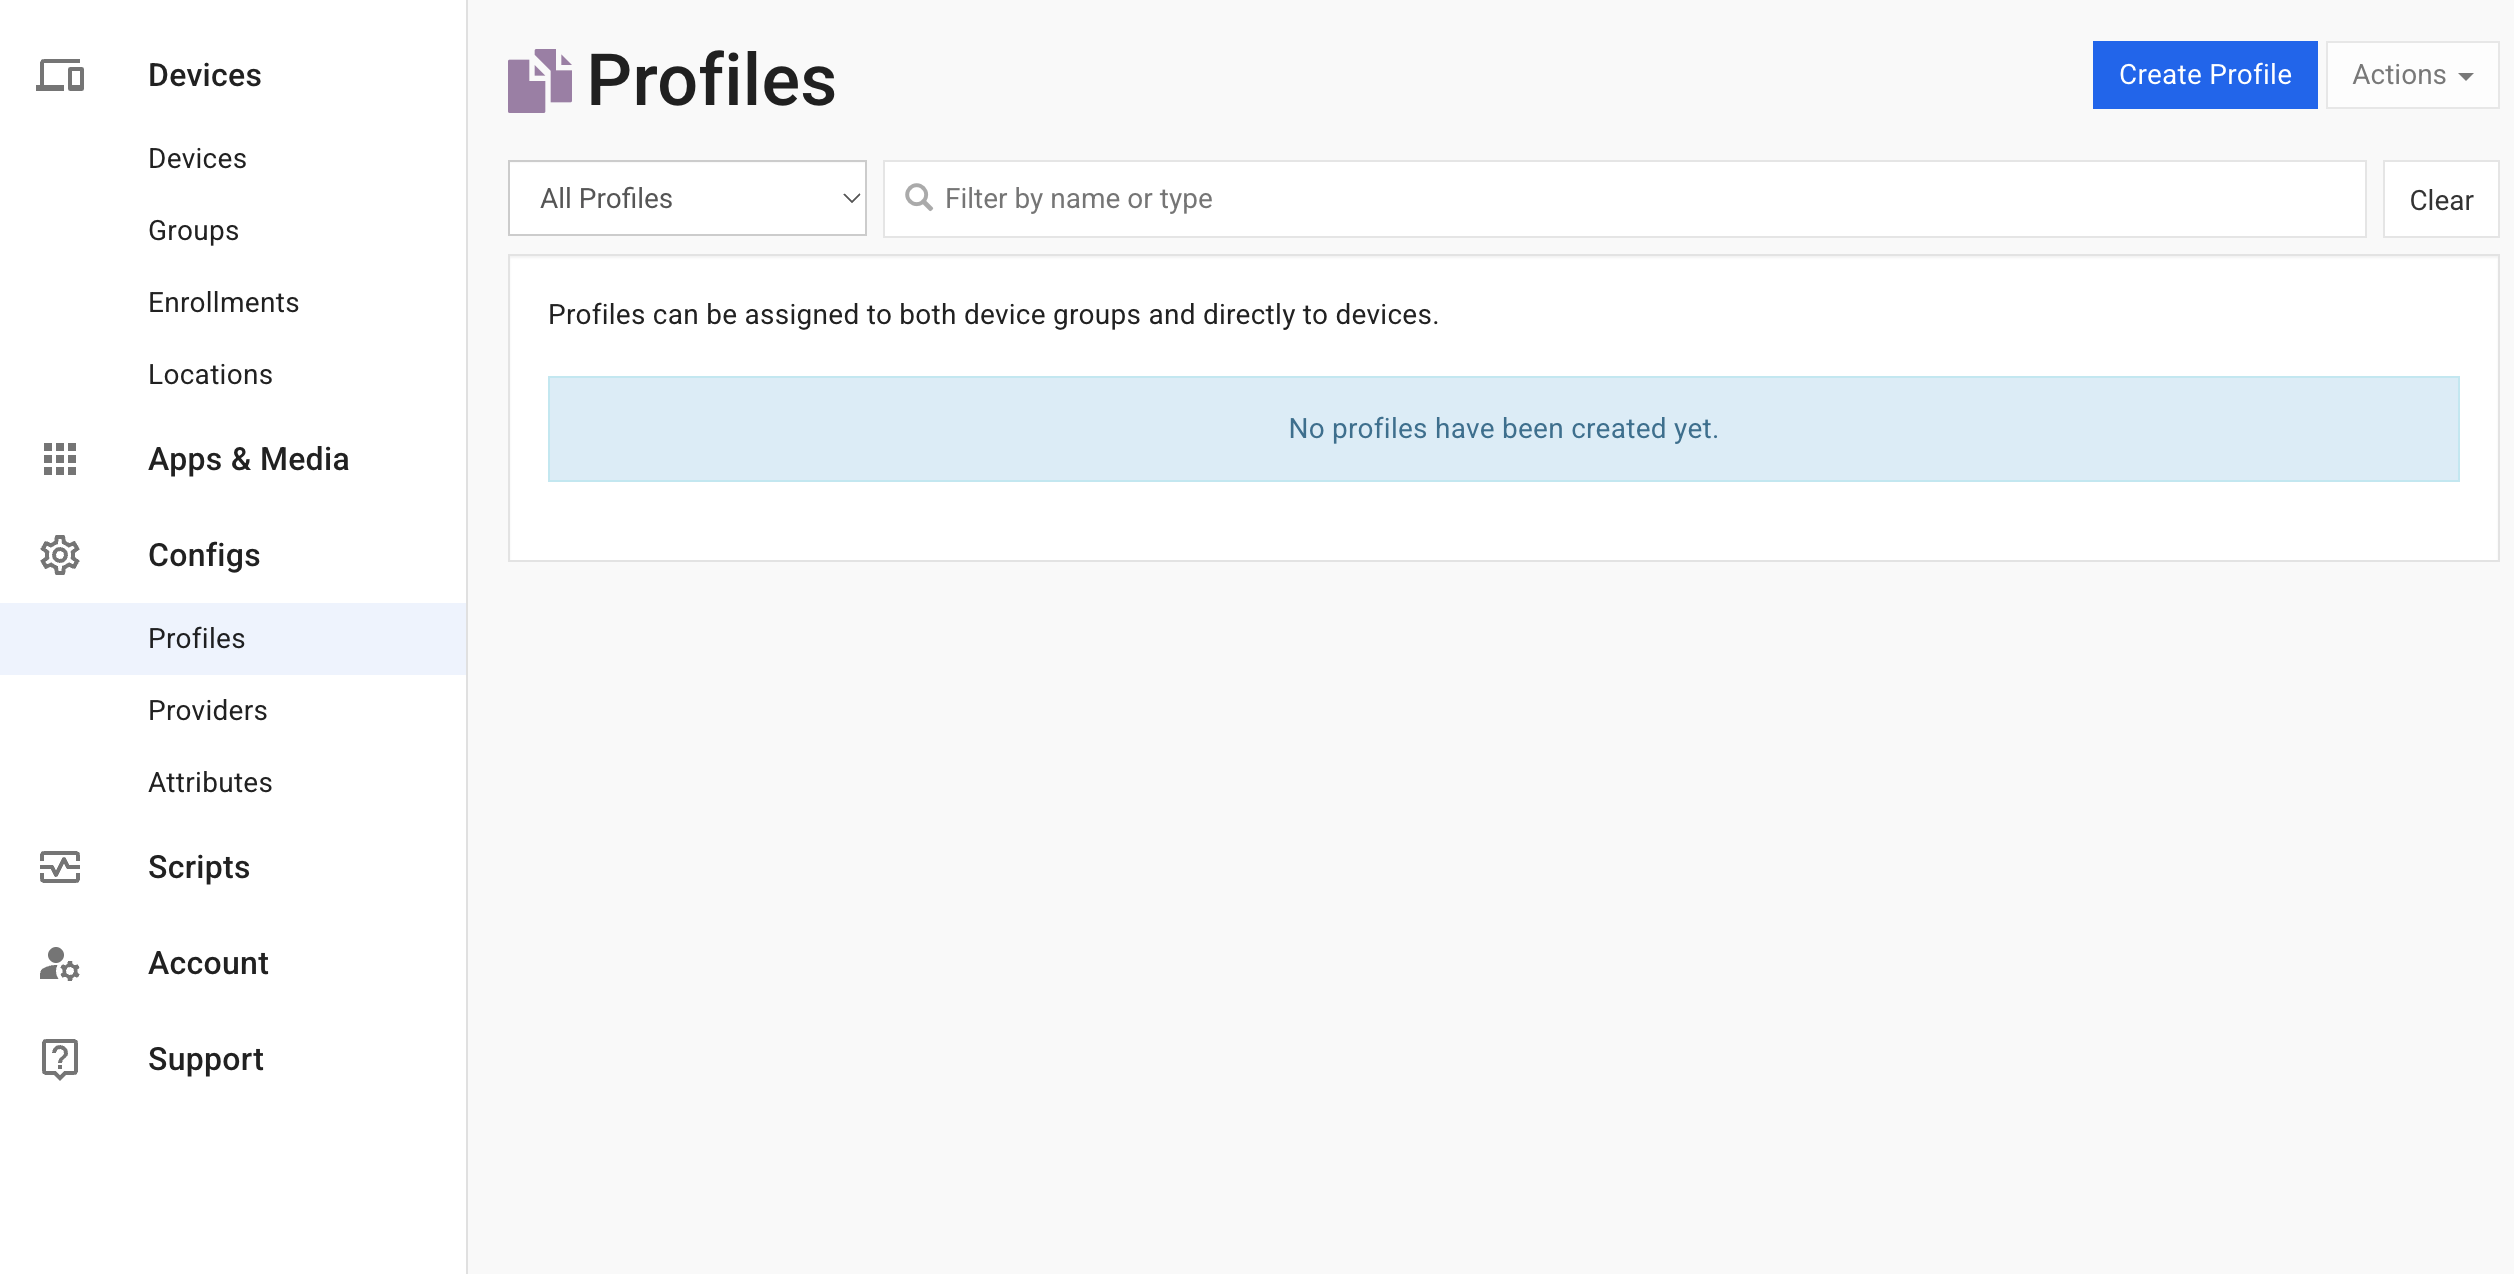
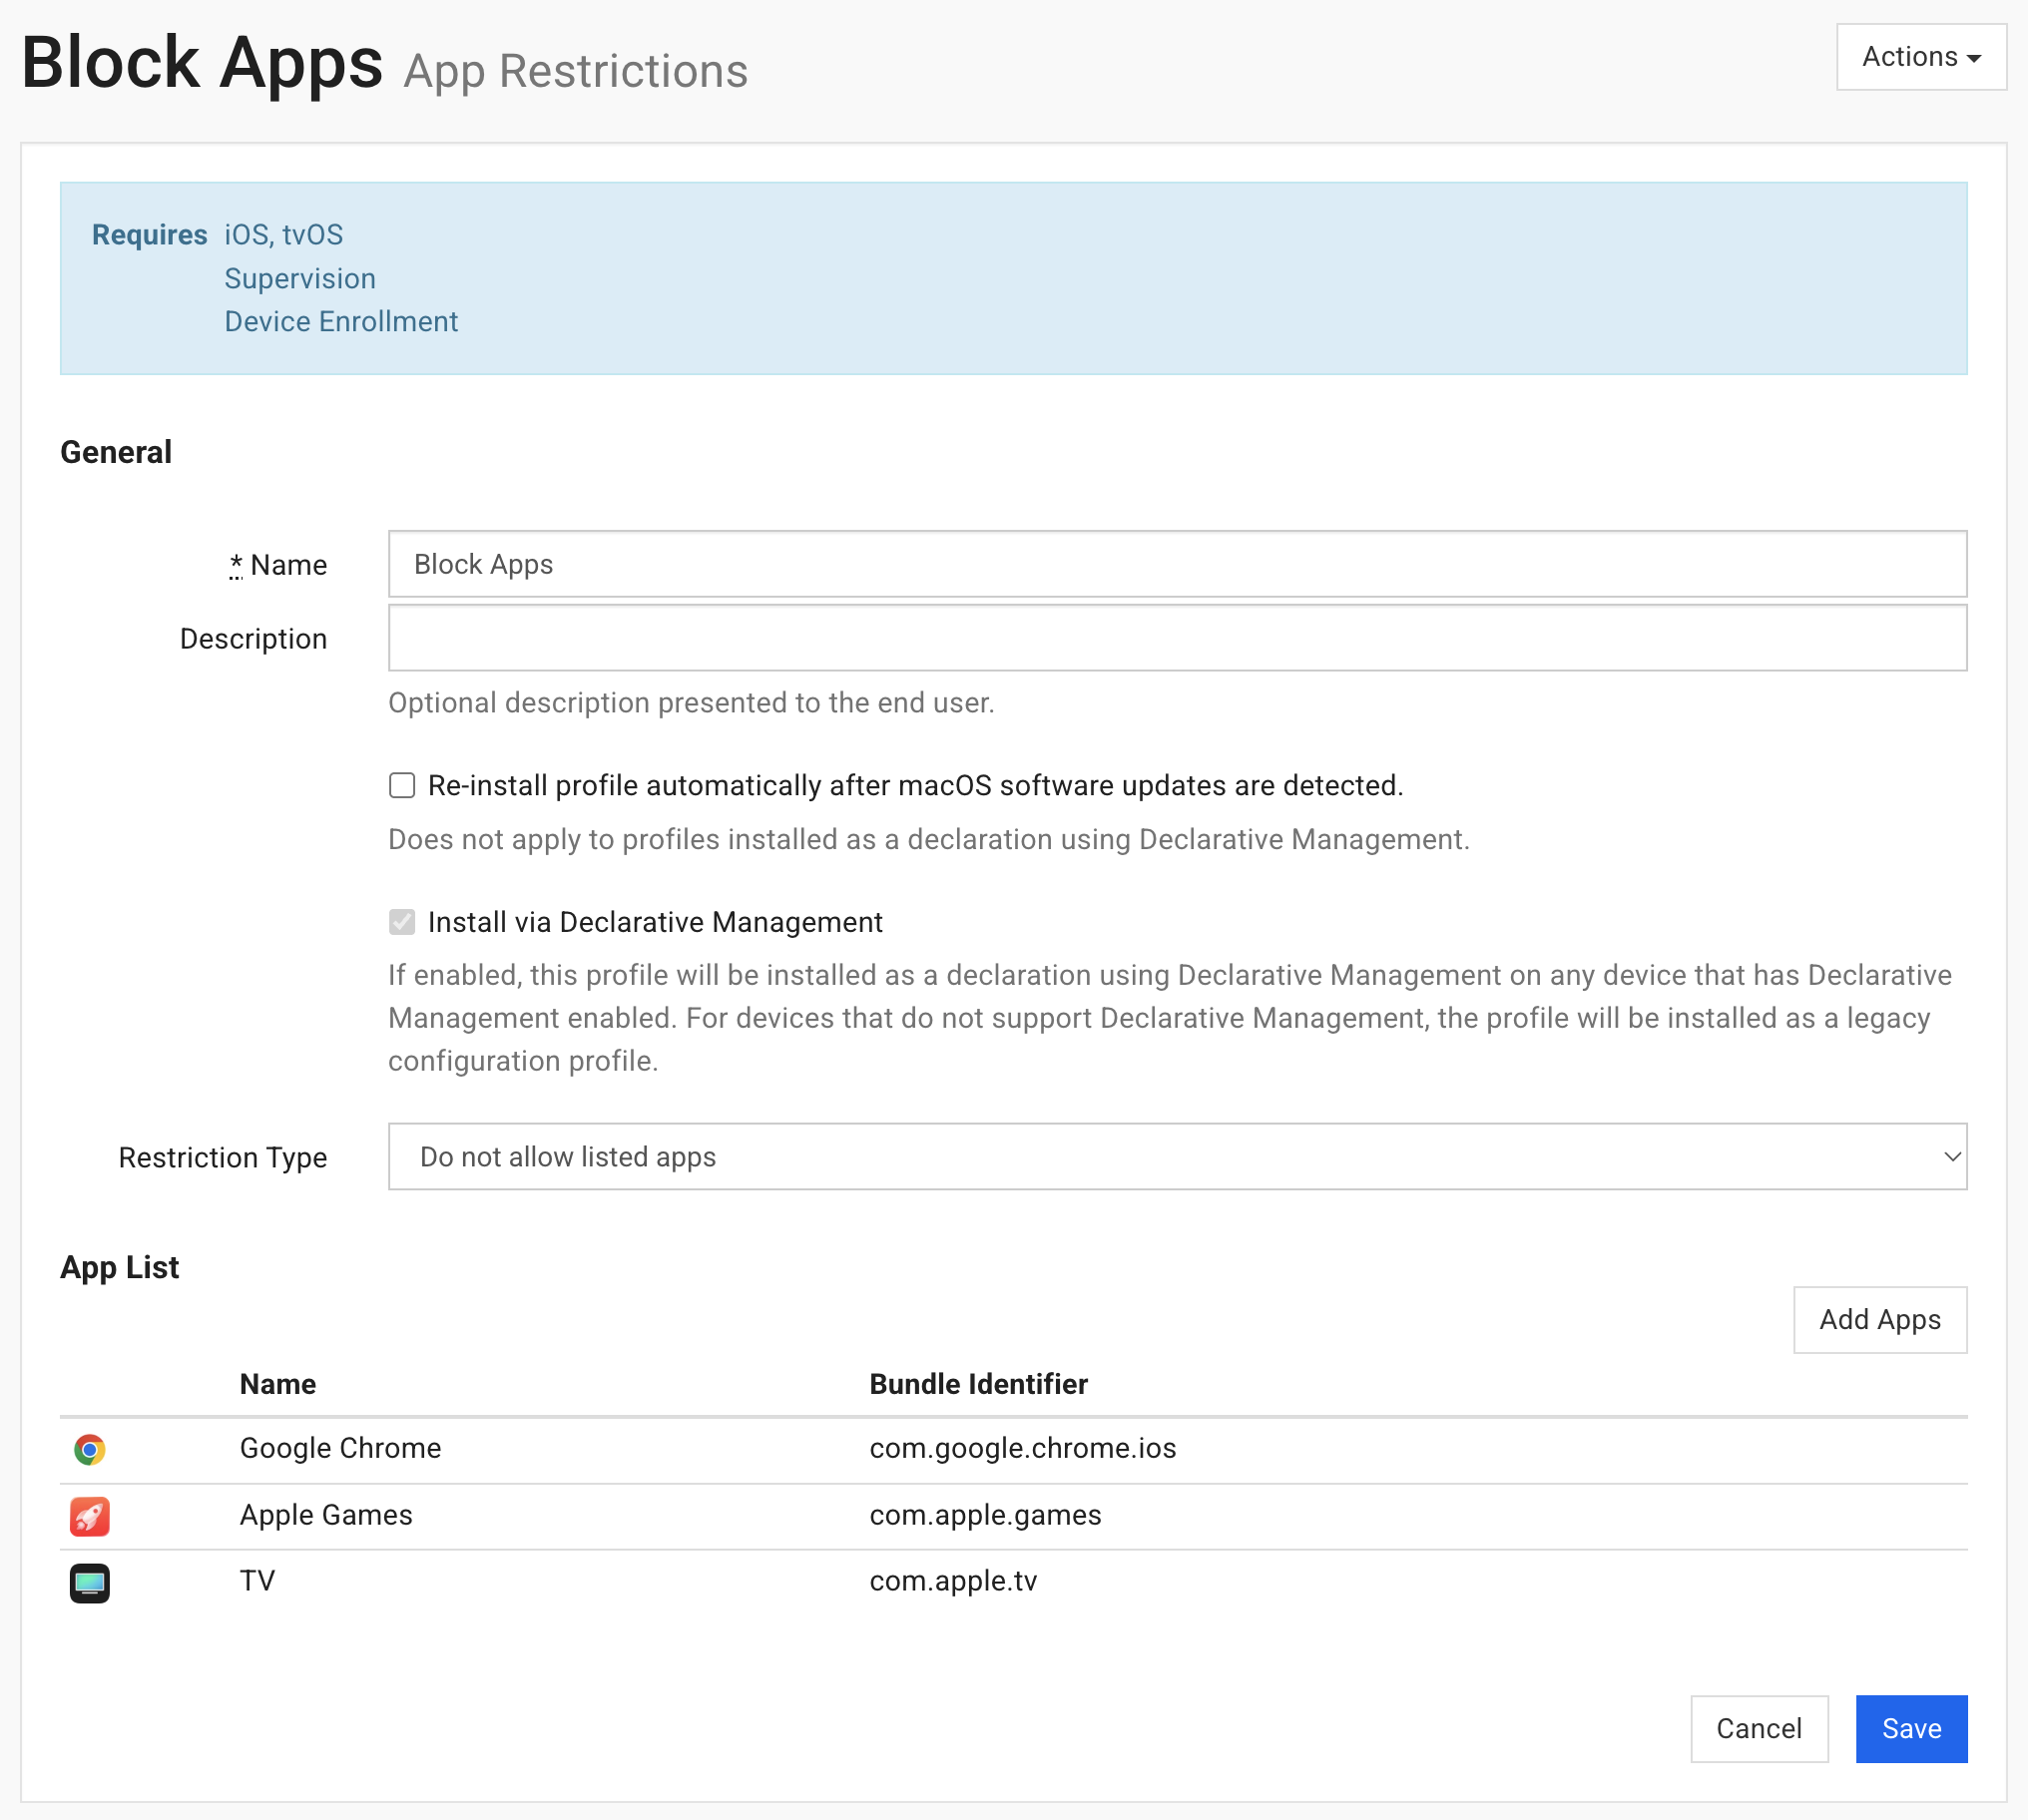
- To block apps, choose the App Restrictions type. Name it (I used "Block Apps"), set Restriction Type to Do not allow listed apps, then use Add Apps to list each app by its name (you can ignore the "bundle ID" option, the name is enough; the example blocks Chrome, Apple Games, and TV). Click Save. Notice it requires Supervision, which is exactly why supervising came first.
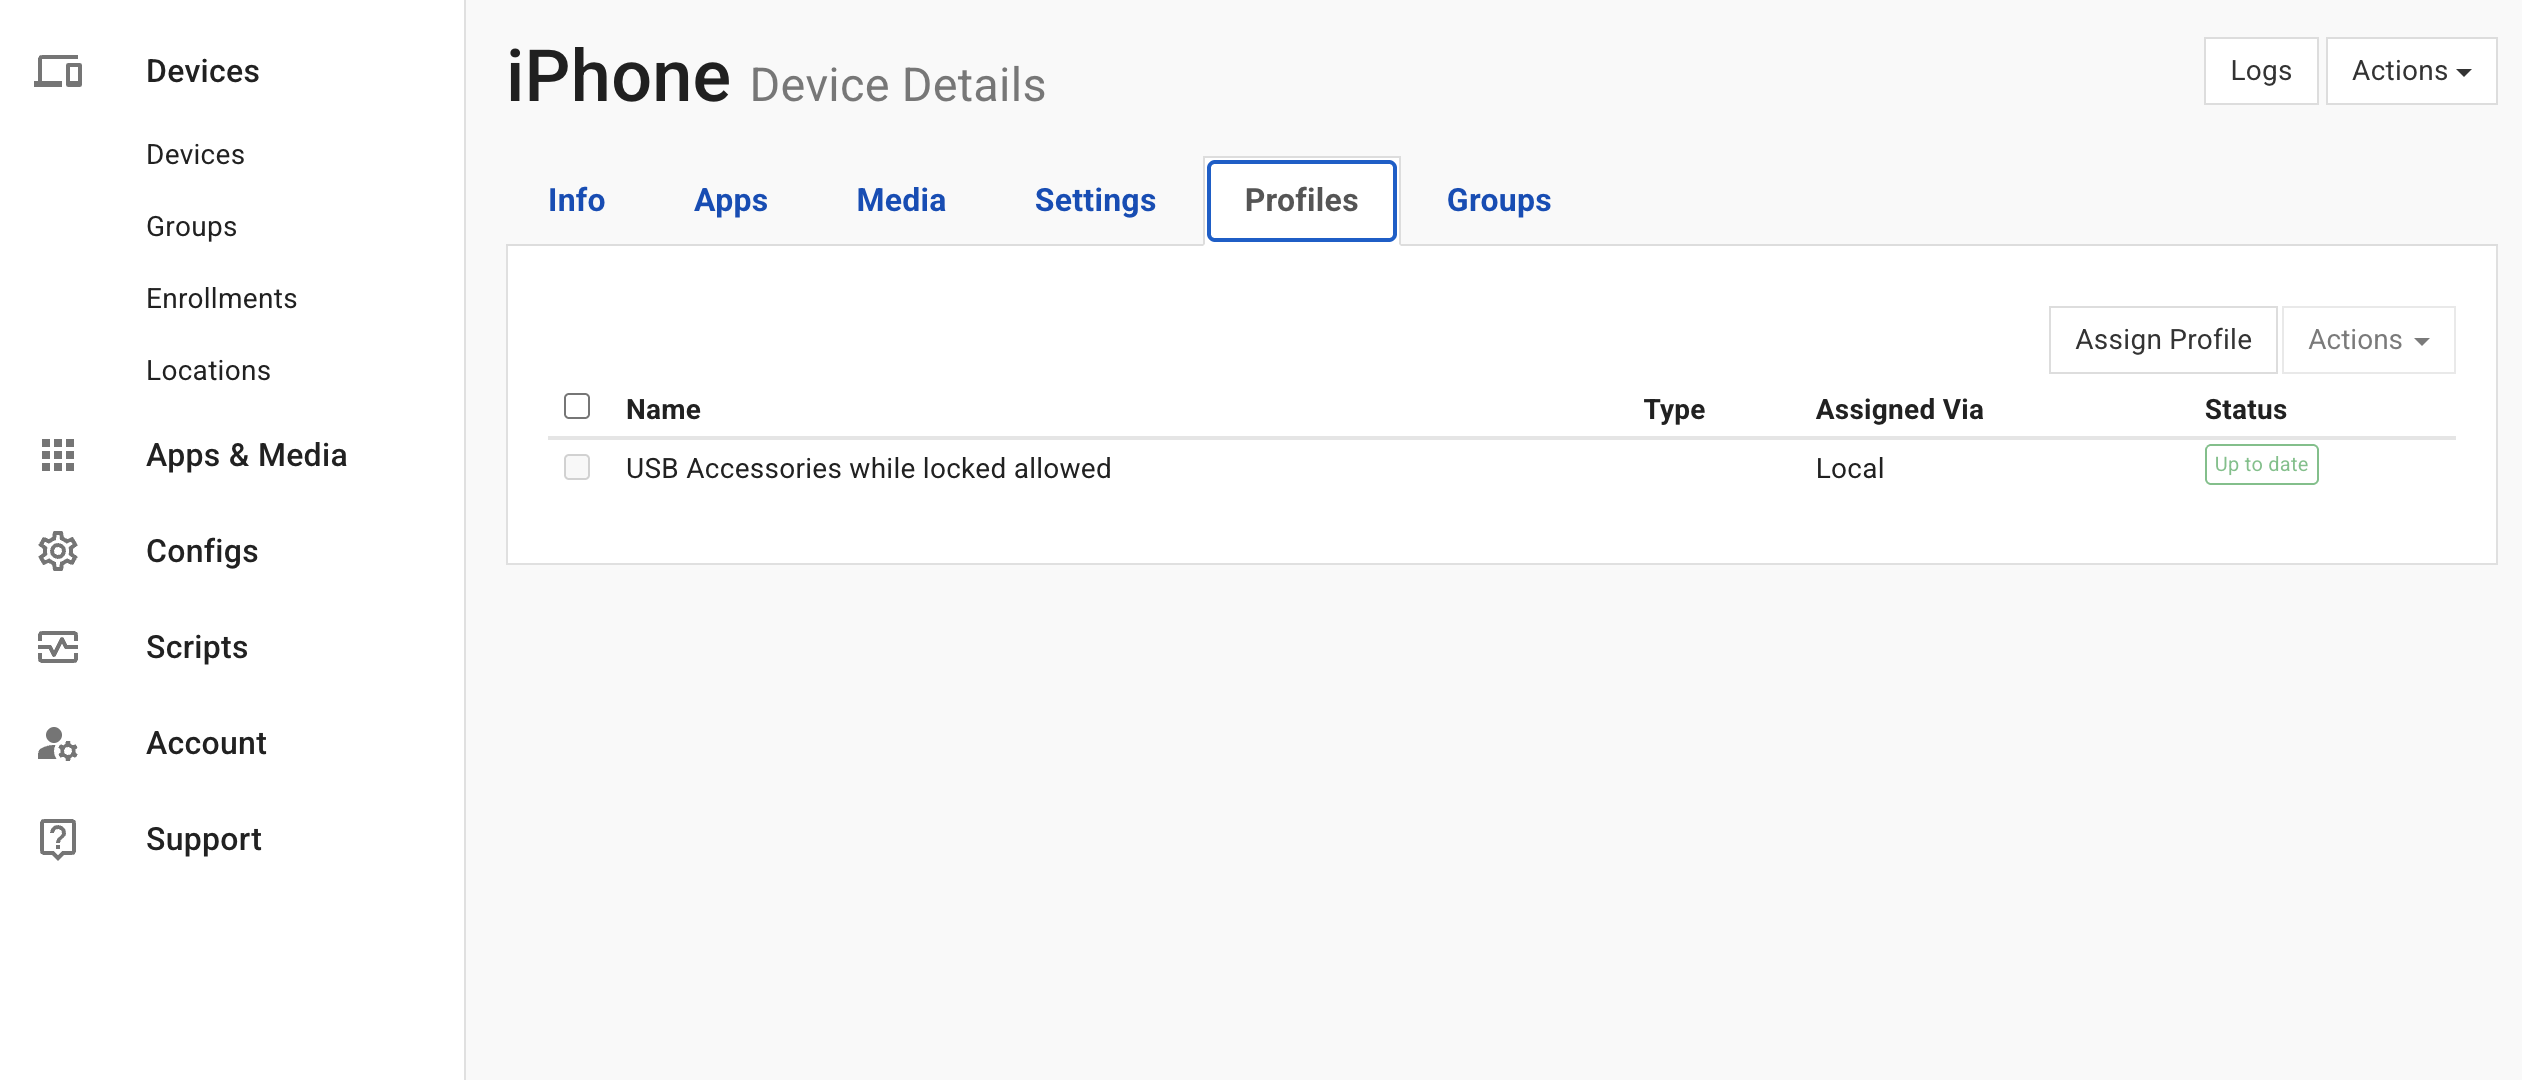
- Now assign it. Open Devices → Devices → your iPhone, switch to the Profiles tab, and click Assign Profile.
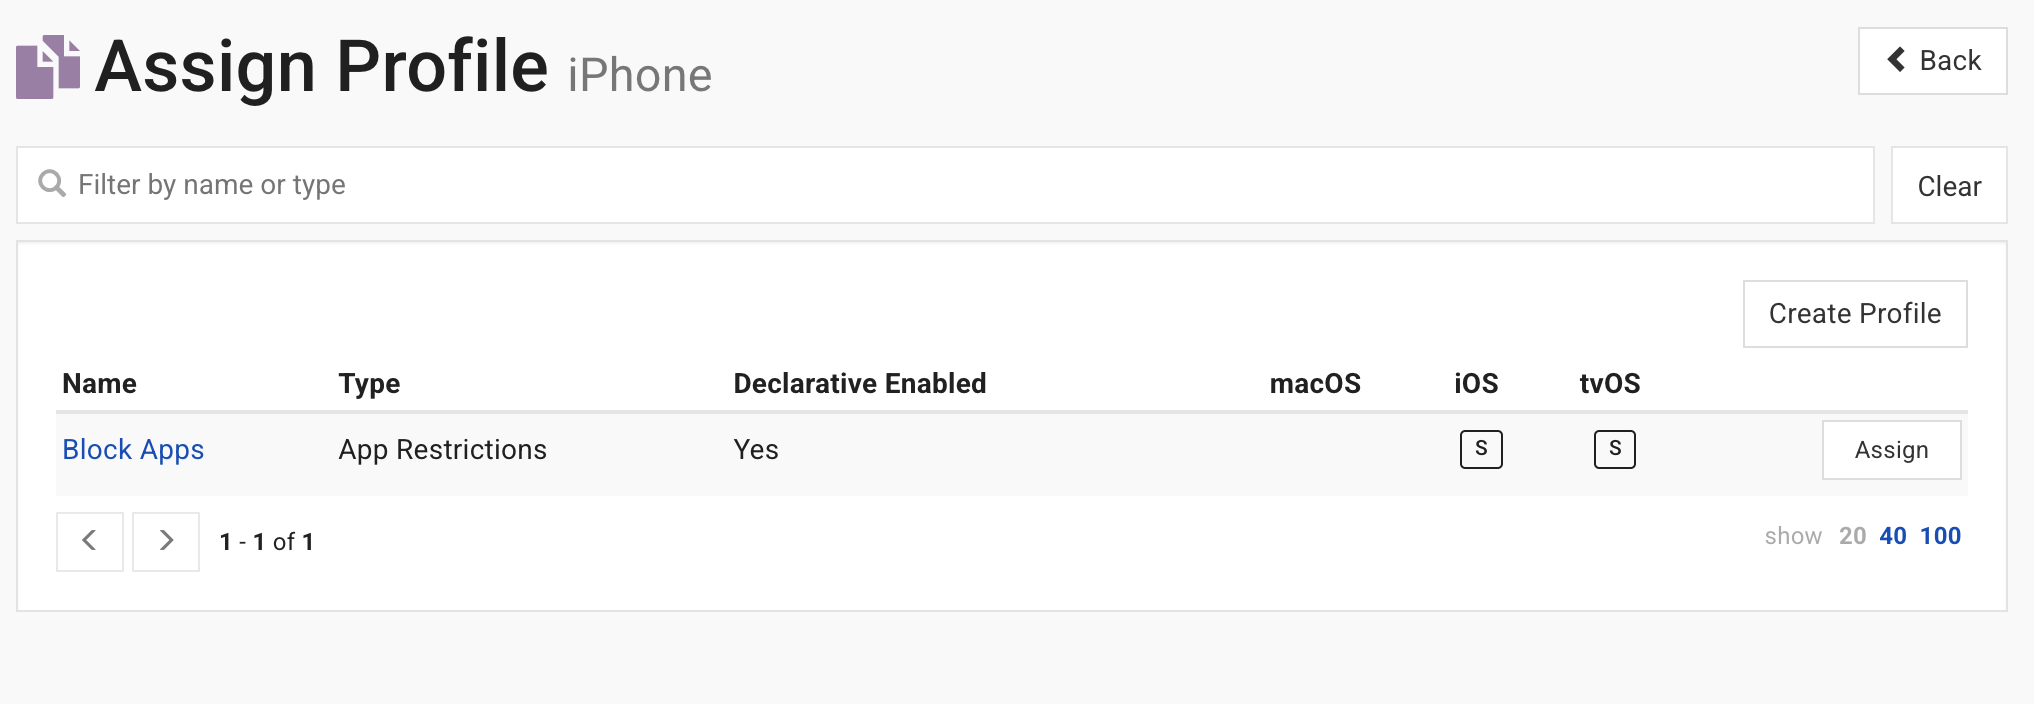
- Click Assign next to Block Apps. It pushes to the phone in seconds. (Assigning to the Default group instead applies it to every phone in that group, handy if you set up more than one.)
Build the rest of your rules the same way (most live under the Restrictions profile type). The ones that matter most:
- Blocked apps: block by name, including apps you previously approved.
- Prevent removing apps so they can't delete the ones carrying your controls.
- Prevent "Erase All Content and Settings" (the factory-reset block).
- Prevent VPN creation so they can't tunnel around the web filter.
- Prevent account changes and prevent pairing with a computer (stops the phone from connecting to a computer, which a tech-savvy kid could use to undo your work), for a determined teen.
- A web content filter (Apple's built-in one; the heavier NextDNS filter is an optional add-on at the end).
Step 6 of 7
Test enforcement
about 5 min
Block an app and watch it vanish from the home screen in seconds. Unblock it and watch it come back. That responsiveness is the whole point, and it's night and day from Screen Time. Commands land in seconds when the phone is online; if it's offline they queue and run the moment it reconnects.
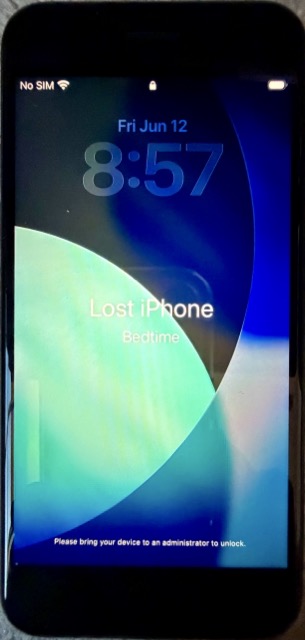
To see what Lost Mode can do, you can test it manually using the SimpleMDM dashboard. Open Devices → Devices → your iPhone and click the Actions dropdown and select Enable Lost Mode. Type a message in the dialog (I use "Bedtime") and click Enable Lost Mode. Within a few seconds the iPhone will lock to a single screen displaying Lost iPhone, and whatever message you typed. Lost Mode is a real lock, not a nudge, and it's a supervised-only command.
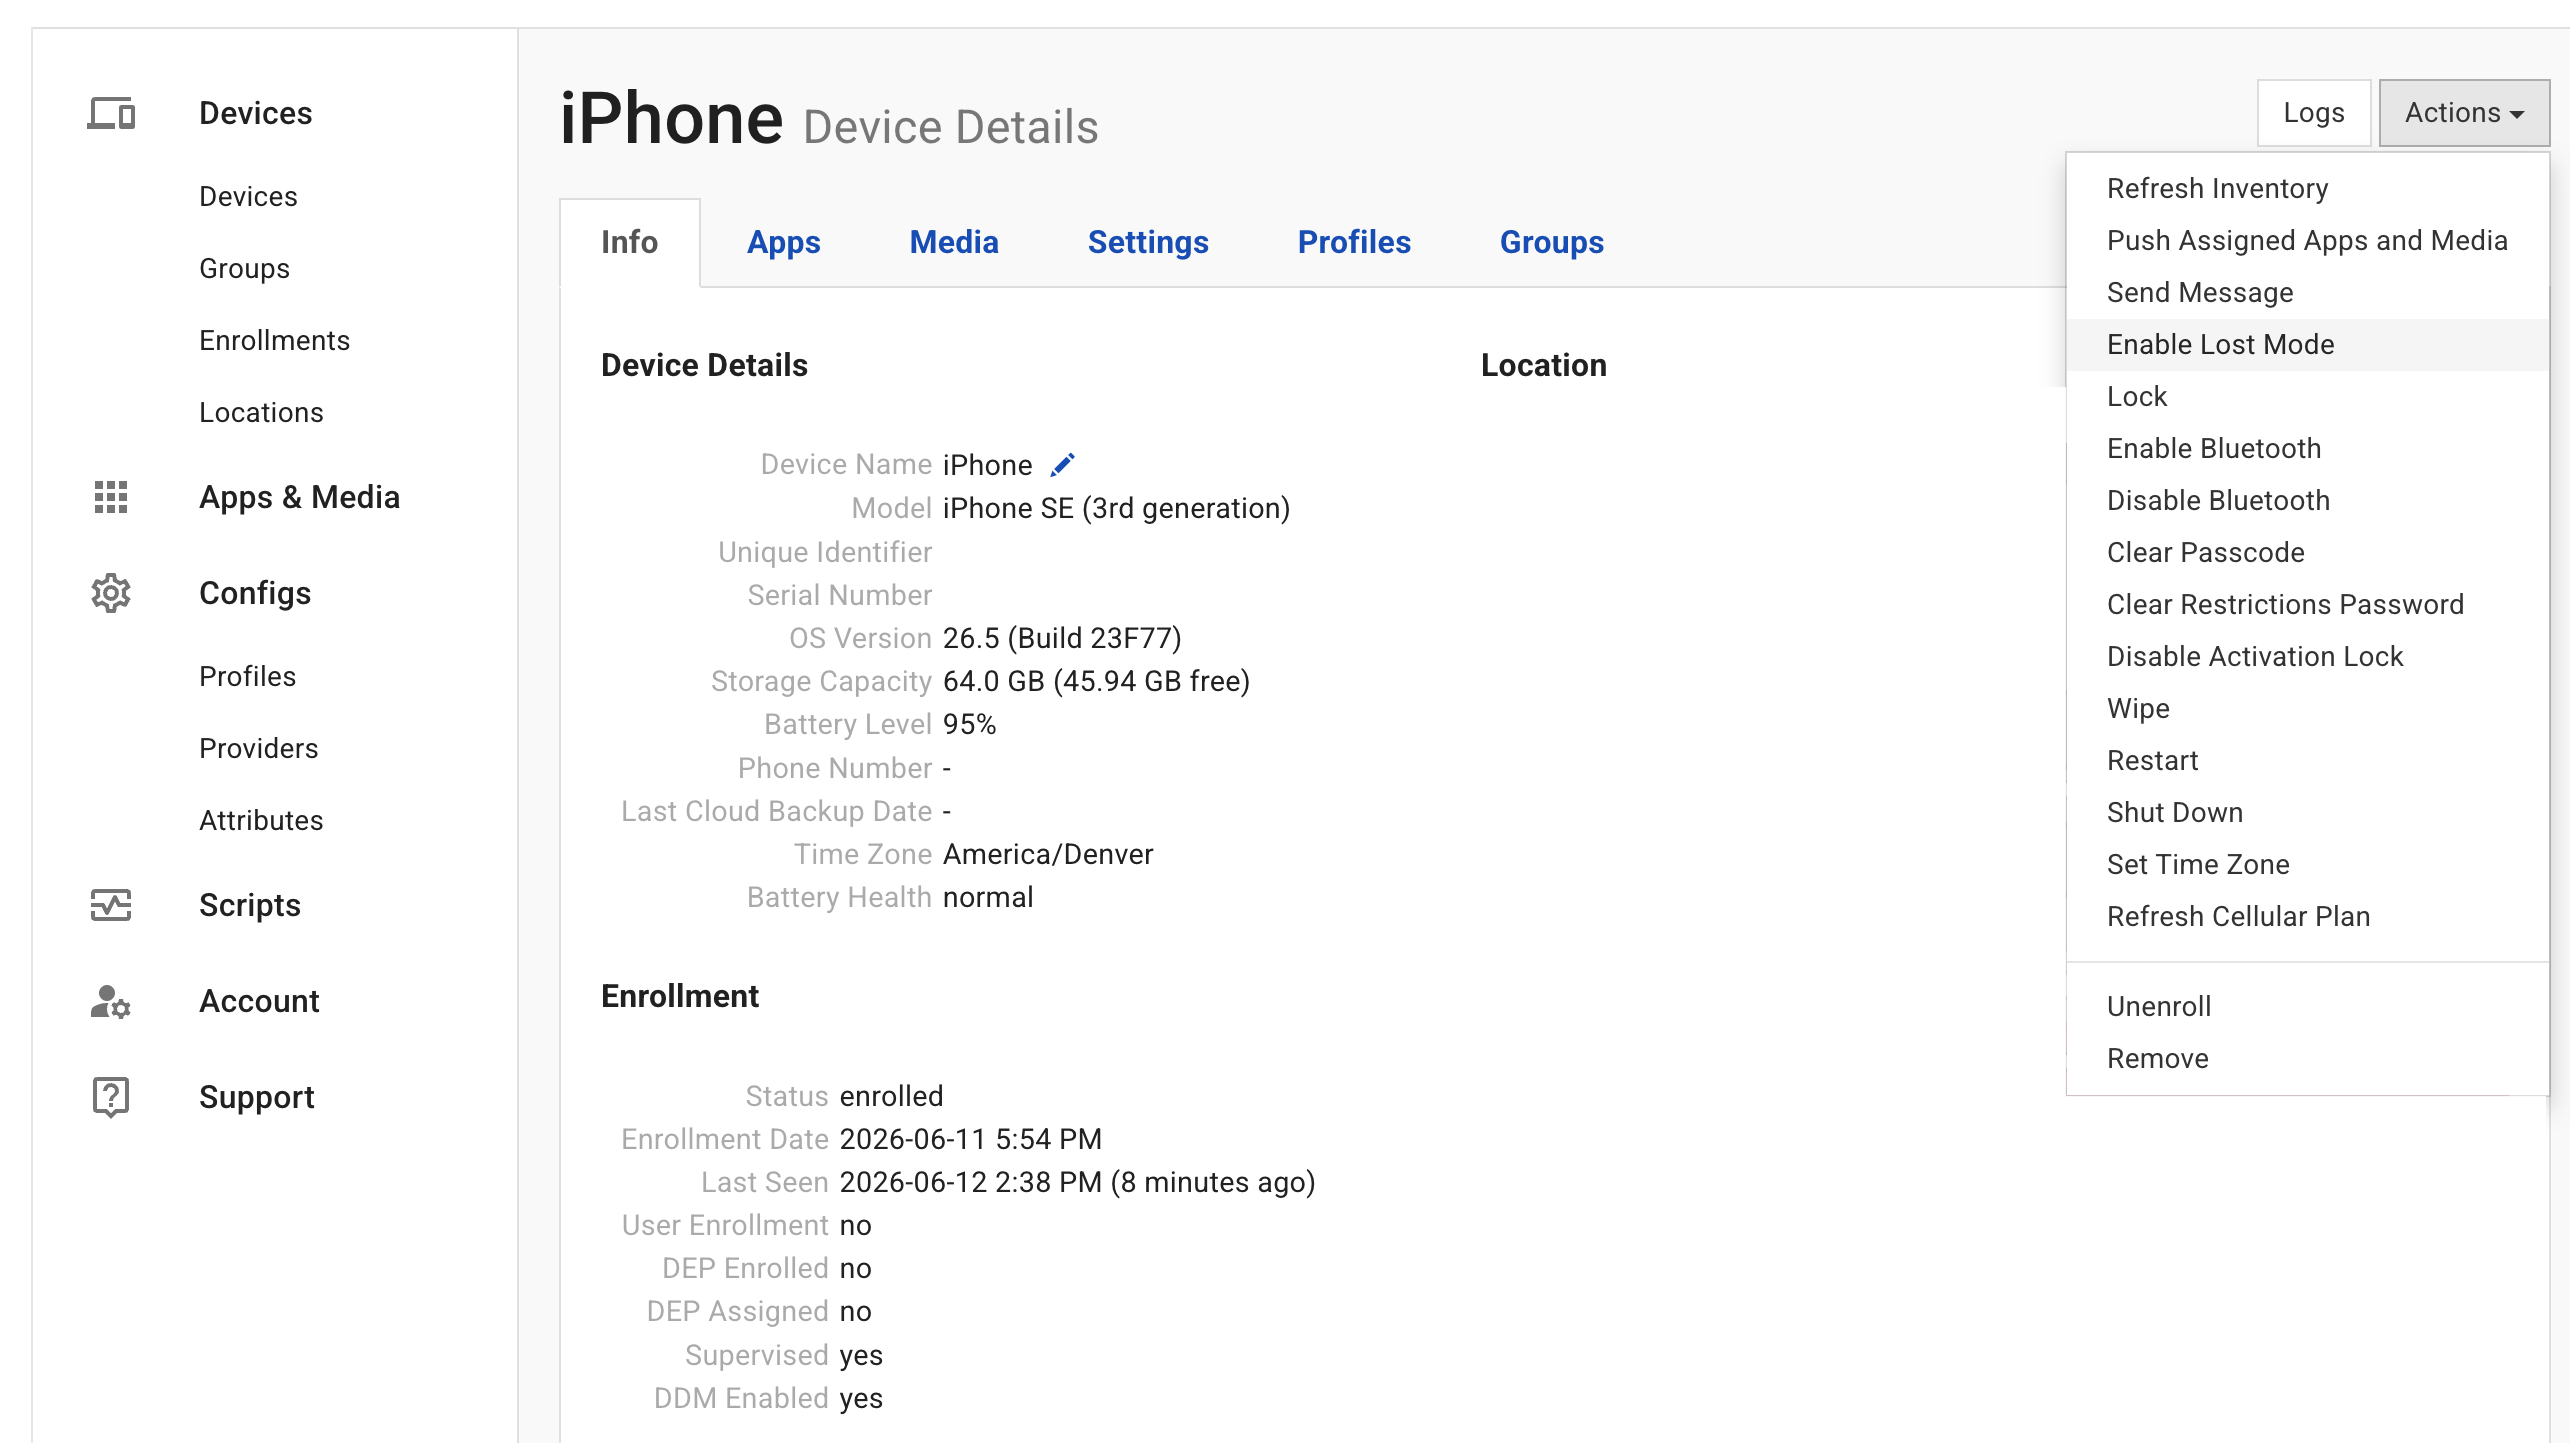
Once the phone is in Lost Mode, you should see a button to disable Lost Mode on the device details screen. (Note: you may have to refresh the SimpleMDM page for that button to show up.)
Context
Your nightly shutoff (Lost Mode)
Your single best nightly tool is Lost Mode: a real, supervised-only lock that turns the phone into one dark screen with nothing to swipe or open, recoverable in the morning with a single command. You already triggered it by hand from the SimpleMDM dashboard in the test step above, so you know it works.
To make it effortless, one tap on your own phone, or a fully automatic bedtime schedule, follow the first add-on: The bedtime lock. It's the upgrade most parents say did the most for their evenings. (It's a bit fiddly, so it lives in its own walkthrough instead of cluttering this one.)
Context
Add a web filter (NextDNS)
Your supervised restrictions already include Apple's basic web content filter, so the core setup isn't wide open. For an explicit, logged block on porn, ads, trackers, and malware across every app, add NextDNS as a managed profile.
That's the second add-on: Add a real web filter with NextDNS (coming soon). Free for light use, and it gives you a dashboard of exactly what the phone tried to reach.
Step 7 of 7
The ABM path (decide before you start)
about 2 wks
This is the optional upgrade for a determined teen, and it's the one piece you have to line up before you begin, not after. With ABM, supervision re-applies itself even after a factory reset and the management profile can't be removed at all. The catch is timing: ABM only goes onto the phone via a checkbox during the Configurator erase, and the account approval takes one to two weeks, so it can't be bolted on once the phone is already set up. Deciding on it later means repeating the whole erase and restore. If you're on the fence, it's completely fine to run the no-ABM path first as a trial and add ABM later if your family needs it, just knowing you'll redo the setup that once.
The barrier sounds bigger than it is. ABM needs a DUNS number (a free business identifier), and you can get one as a sole proprietor under your own name; your SSN is the tax ID, no LLC required. Apple then verifies you, usually with a quick phone call. Budget one to two weeks for approval. One caveat to check first: DUNS may have been dropped for new US Apple Business Manager signups as of around April 2026, so verify Apple's current requirement before you count on it.
BrianI did this myself. The DUNS number and the verification call sounded like a hassle and turned out to be a short, friendly phone call, someone just confirming I was a real person. For a kid who'll try a factory reset, it was absolutely worth it.Three different "off switches," and people mix them up. The names sound alike, so untangle them once:
Supervision has no off switch in Settings. The only way to remove it is to erase the phone, either Erase All Content and Settings or re-running Configurator's Prepare without supervision. On this no-ABM local path, an erase fully unsupervises the phone, that's the trade-off, and it's also a determined kid's way out, which is exactly why the restrictions step above blocks "Erase All Content and Settings." (Add ABM and an erase re-supervises instead, so there's no escaping it.)
"Leave Remote Management" is the MDM, not supervision. That option only shows up because the phone is enrolled in your MDM, and tapping it drops the management profile (your remote control and the rules you pushed), not supervision itself. On a supervised phone you can set the enrollment to be non-removable so it can't be tapped away.
The ~30-day window belongs to ABM, not local supervision. It's the ABM provisional period: when you add a Configurator-supervised phone to ABM, it's released provisionally for about 30 days, and once that lapses the phone is permanently tied to your org and re-supervises itself through any factory reset. Plain local supervision has no such clock, only the erase escape hatch above.
Context
What this setup cannot do (so you're not surprised)
- It cannot quietly read iMessage. The only method (a finicky desktop sync that needs your teen's constant permission) breaks exactly when you need it. Don't build your plan around catching messages.
- It's not 100 percent bypass-proof against a truly determined, technical teen. A very technical teen using special computer software could, in theory, wipe this kind of supervision (ABM re-applies it on the next activation, which is what prevents even that). But supervised, plus the factory-reset block, plus ABM locked in past its provisional window, is a very high bar.
- One management profile per phone. A school-managed phone can't also take yours until that's resolved.
None of those change the result for the kid you're actually raising: a phone that sleeps when it should, blocks what you say, and filters the web everywhere. That's the calm I was after.
Want the printable version of this checklist?
I'll send the step-by-step PDF, plus a heads-up when an app or setting changes that affects your kid's phone.
Brian
I spent my career in security: the FBI, CrowdStrike, and now detection engineering. I'm also a dad who got beaten down by Screen Time like everyone else. I write this for the parent I was not long ago. More about why I built this →
Next up
The Bedtime Lock: One Tap to Lights-Out, Automated
The upgrade that actually changed our evenings: lock the phone at night with one tap, or on a hands-off schedule, using Lost Mode and a free Shortcut.
Open this add-on →Add a Real Web Filter: Block Porn, Ads, and Malware with NextDNS
The optional second layer: DNS-level filtering that blocks and logs porn, ads, and malware across every app, on Wi-Fi and cellular, pushed through your MDM so it sticks.
Open this add-on →
Questions & comments
I approve everything on-topic, including criticism. I remove only spam, abuse, personal attacks, and off-topic noise.
No comments yet. Have a question about the guide overall? Ask below. (You can also comment on a specific step above.)